
![[Company Logo Image]](images/sphere_smooth.gif)
Frequently Asked Questions
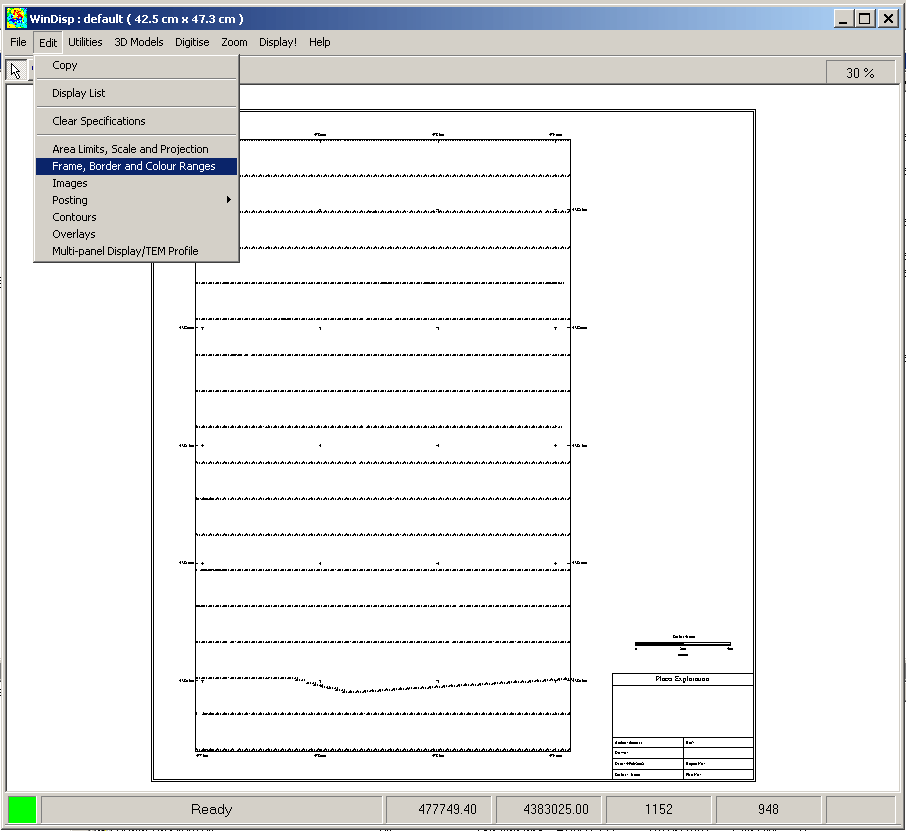
1: Showing multiple images in WinDisp as multi-panel plot
1 Click on File> new to start a new layout, click on Cancel or double click
on the Start a new layout option
2 click on the Edit> Multipanel display/TEM profile menu option
3 double click on the first line in the panel list (on the grey number)
4 click on the Image and Topo tab and select the required grid file
5 click on the Set limits from Image file button, change the display style as
required and change the panel label at the bottom of the form
6 click on the OK button and the repeat the process from 3 for the next
panel until you have loaded all of the images you want to display
7. Click on the column to Use values to change where the panels will be
displayed eg if you just have vertical sections, then you can leave them all in
column 1 and they will be displayed one under the other down the page with the
first panel at the top. If you have res and chargeability vertical sections, you
might put all of the res panels in column 1 and all of the chg panels in column
2. If you are displaying multiple depth slices, you may want to spread them
across the page eg for 9 panels you'd have the first 3 in column 1, the second 3
in column 2 and the final 3 in column 3.
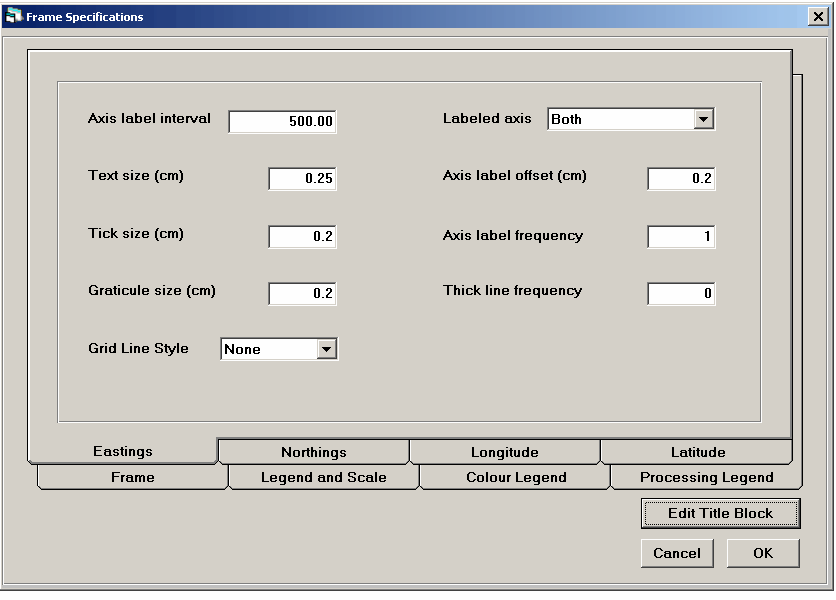
Once you have a layout set up as you want (you can define legends and title box
contents using the Edit> Frame, Border and colour legend menu item), save the
layout for future modification using the File> Save Layout as menu item and then
print it using the File > Print menu item. From this dialog you can print direct
to a Windows printer or you can create a pdf output by selecting the
PDF/PostScript option and changing the page size to Plot Limits (if you want to
print at correct scale) or click on the page size you want and click on the Fit
plot to page option.
2: Exporting a grid file to xyz format
2. Select Display an Image from the opening form and select the image you want to convert
3. On the Image file specifications form, click on the Export> XYZ menu item and select a map scale when prompted
4. Specify the file name for the xyz file when prompted and click on the Store Grid button on the Grid Output Specifications form displayed (Note you can change the x/y limits and grid cell sizes on the form as well as the output format)
5. Specify whether you want null values exported when prompted and the xyz data file will be created
3: Gridding CSV data files
CSV files are common, created by Excel, and can be imported into Windisp. The CSV file is a comma separated file but this is not a requirement of Windisp. A space or tab separated file can be used as can a fixed width format.
The files must contain an X and Y column as well as the data of interest (IP and resistivity in this example).
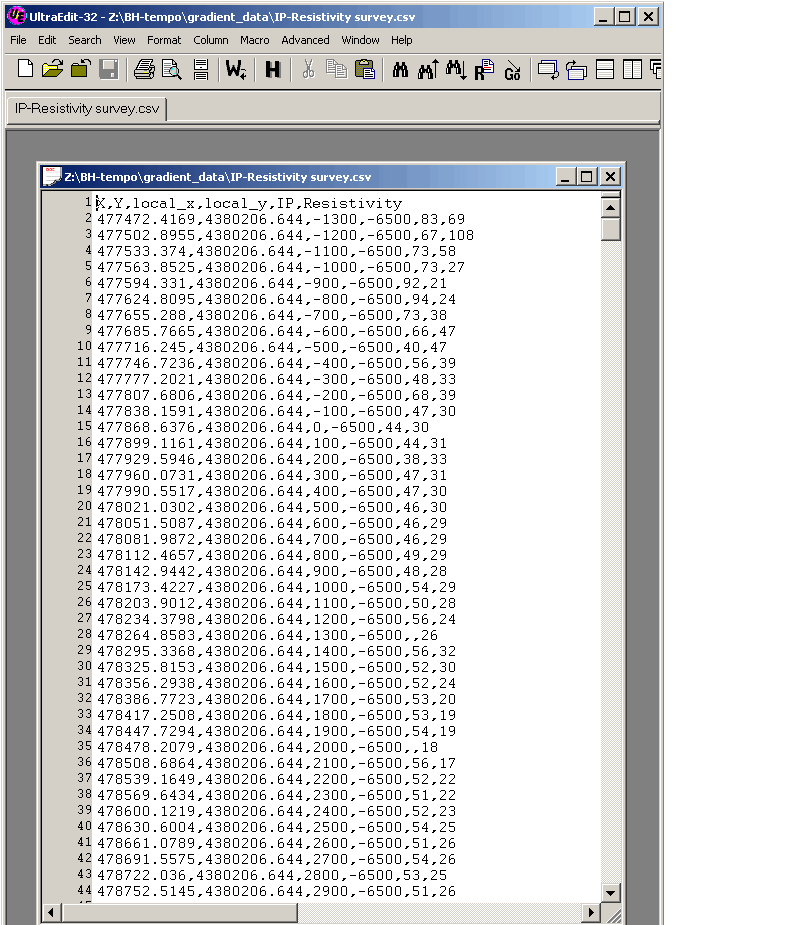
Display of a CSV file in an ASCII editor.
When Windisp is started an initial dialog box is opened. This box is a short cut to getting started but is not actually required. When we are starting out with a CSV or other similar file format, "Post Data" is the option to use. Under "Post Data", not only do we post data but also can grid it.
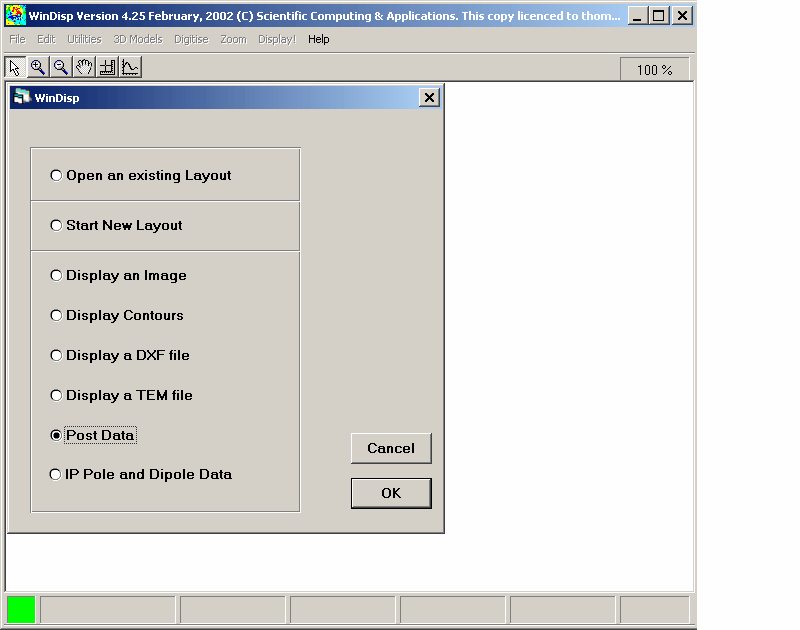
Display of windisp as it is first started with "Post Data" selected.
Windisp will start presenting the user with a series of dialog boxes. The first defines the CSV file to open and how to read it.
For CSV files, these are comma delineated files. It is handy if the first record of the file are column labels. If so, be sure to set the First line with data and line with names options in this dialog box. When completed press the Check Format button.
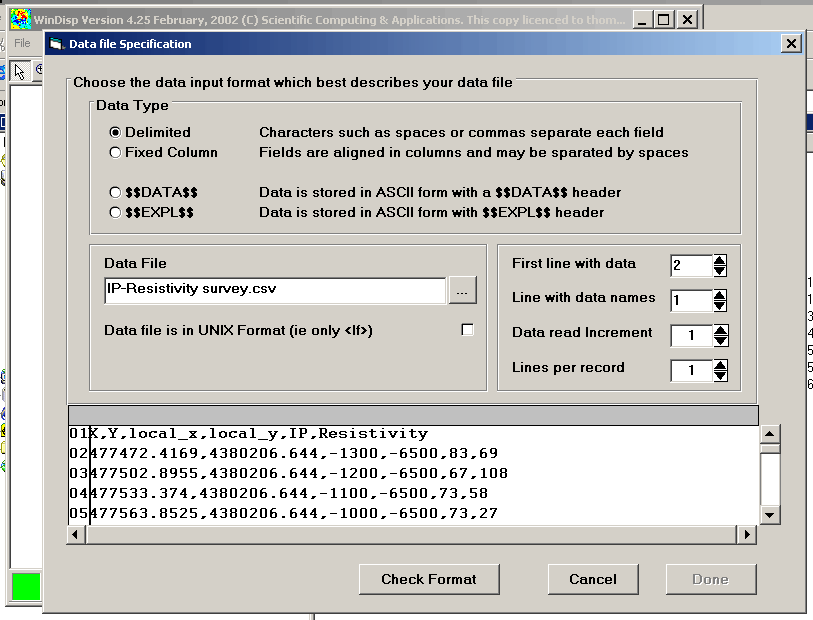
This is the first dialog box, shows the file name and asks for the file type. For CSV it is delimitated. Mind the first line with data and line with data names options.
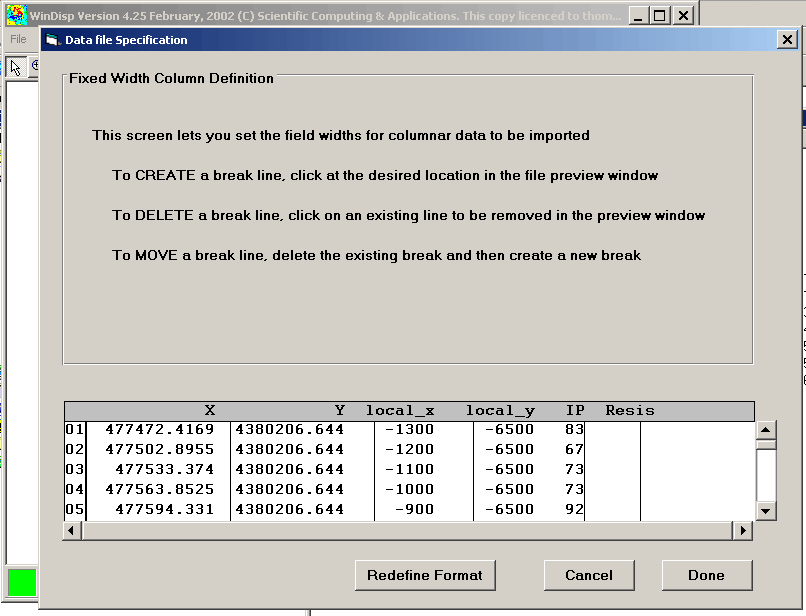
This dialog box is meaningless for delimitated formats such as CSV but is displayed anyway. Just click DONE.
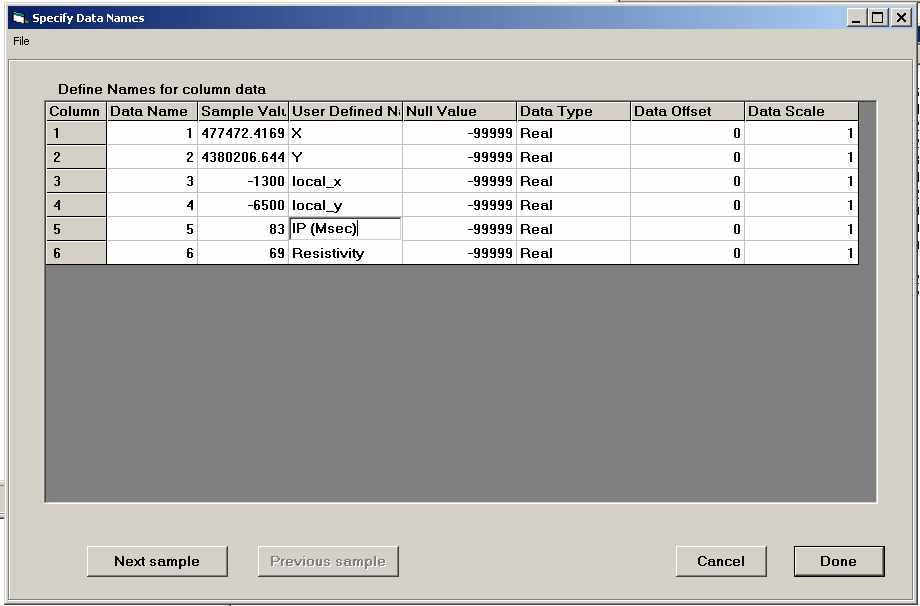
This dialog box allows you to test the import routine but you can also rename columns here.
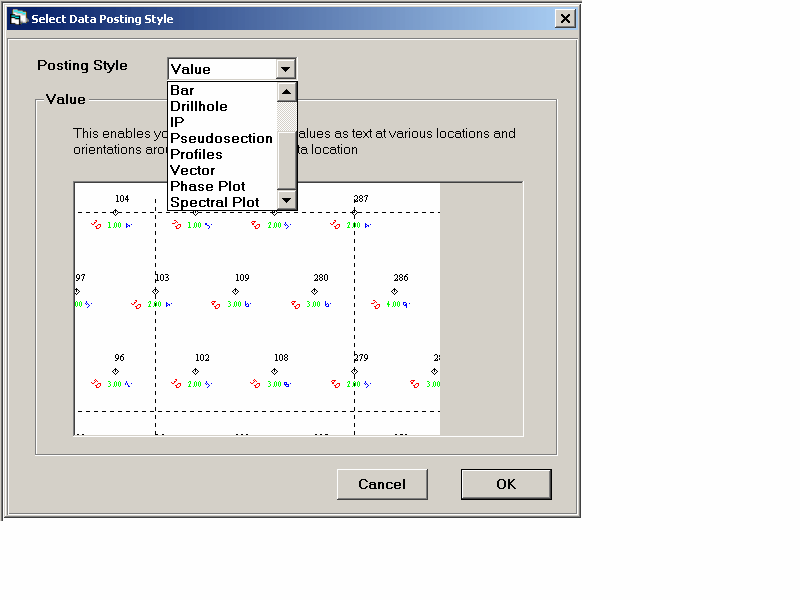
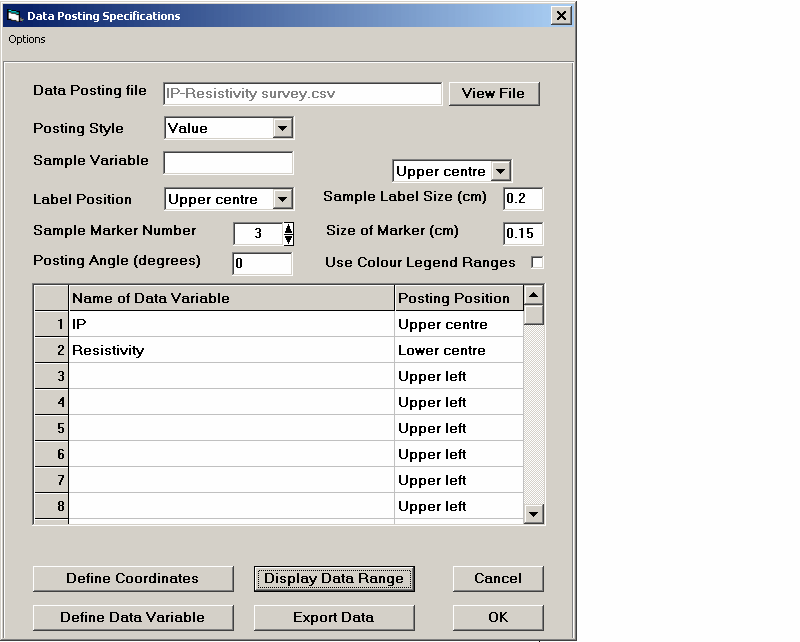
In this dialog box the user can specify the style of the posting.
This is where the X and Y columns are defined. They might be called something else like UTMX, UTMY or easting and northing. Other than defining X and Y columns, the rest of this dialog box is not normally needed.

This is the last dialog box in the series. Here we define the columns to post, or to grid. The location of the posing values can be defined in the Label Position option or the Posting Position.
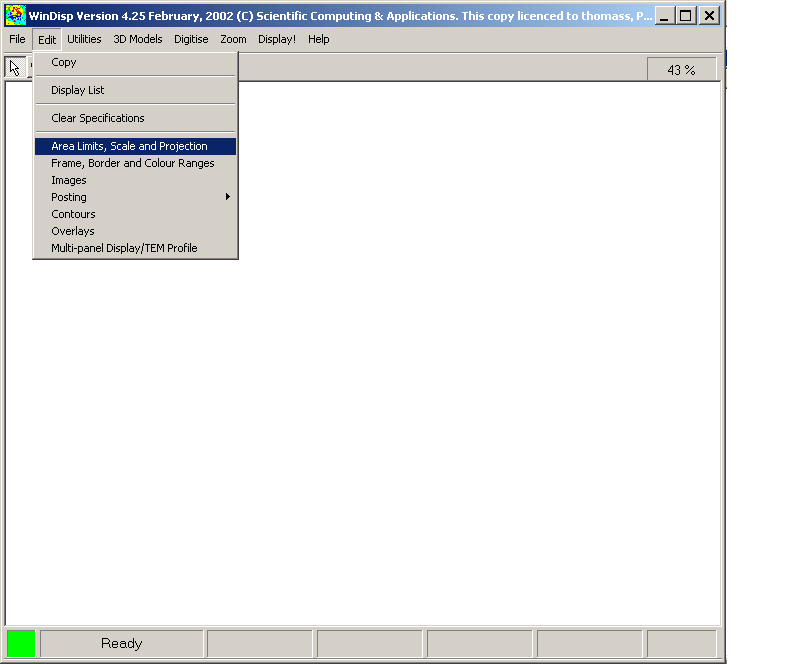
This concludes the series of dialog boxes started from "Post Data" It however is not enough to actually post data. The area and scale have yet to be defined. Go to the edit menu for this:
Use this to enter the SCALE and area of interest.
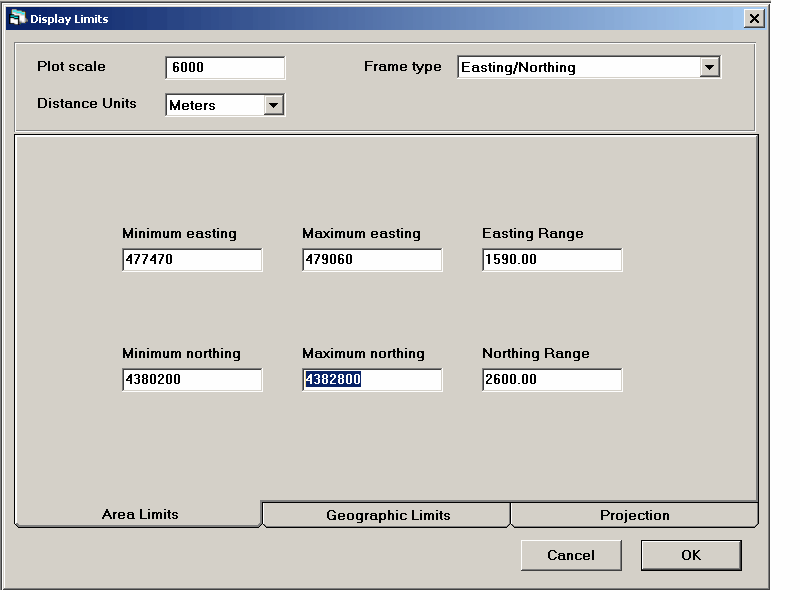
Asks for the scale, units, and area of interest. Once these are entered, Windisp has enough information to display the results.
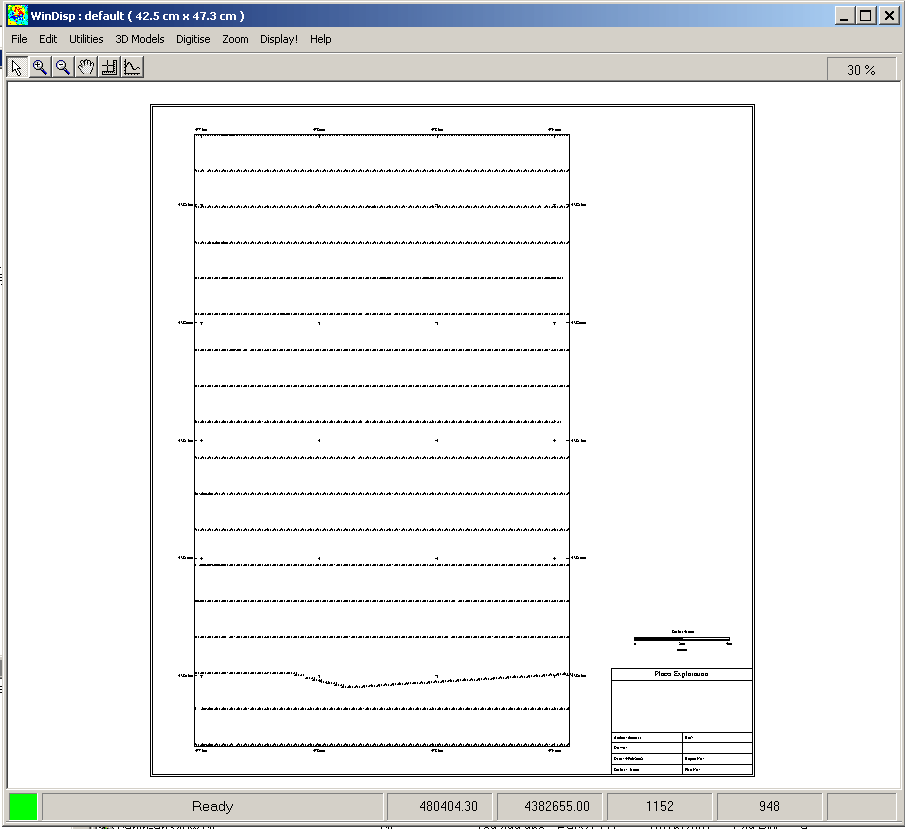
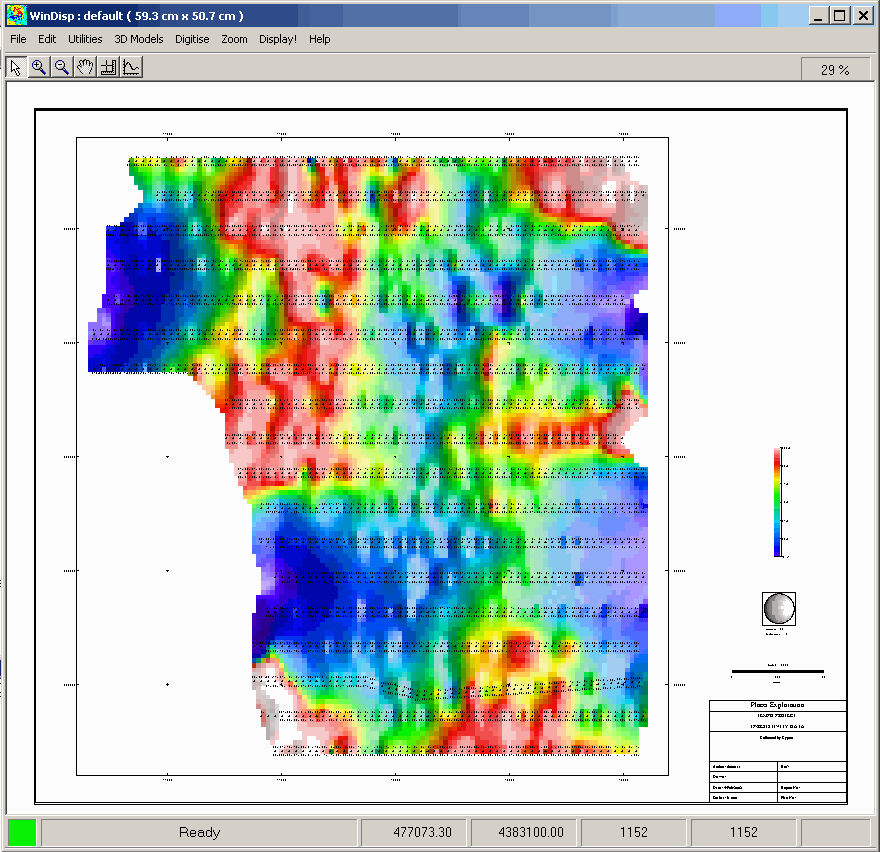
The results after the DISPLAY menu option has been selected. If something is not right, don’t worry, all the parameters can be modified through the EDIT menu to adjust the display. One thing you will want to change is the title block.
This is how to edit/modify the title block.
Select "Edit Title Block" at the bottom of the window.
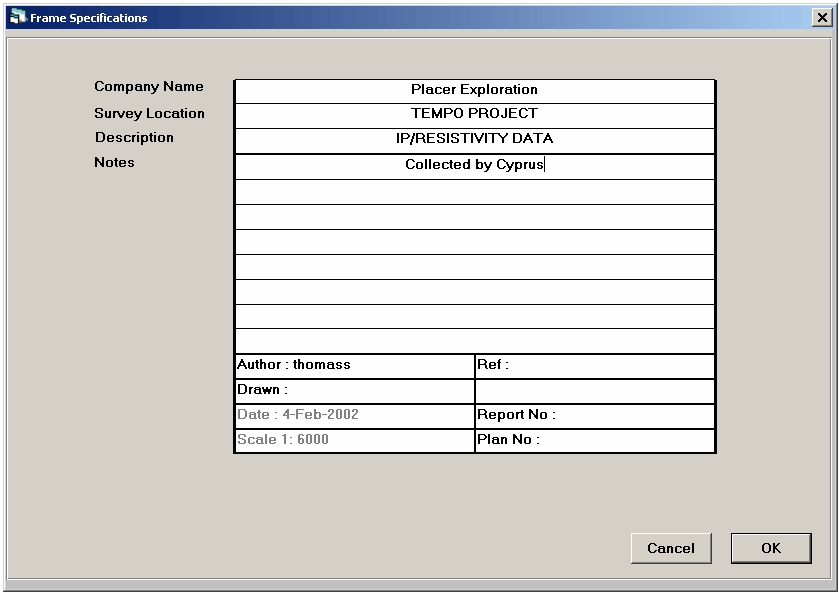
Type in the title block as you want, then hit OK. Once you are back in the main Windisp window, you have to press "DISPLAY" in order for the changes you made to show up.
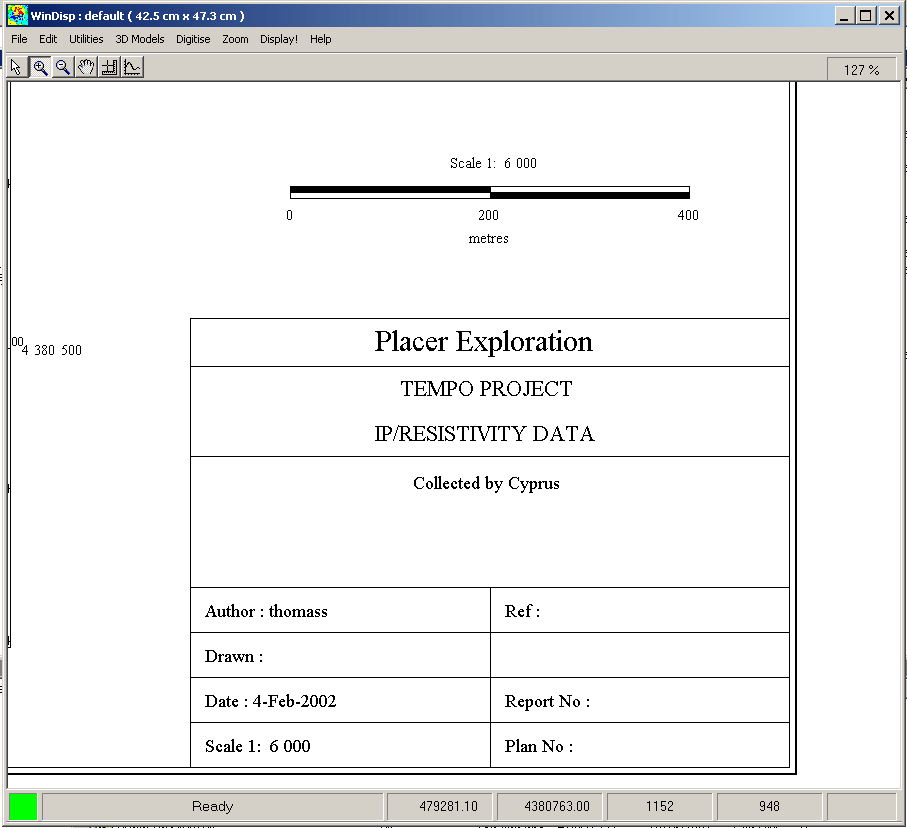
A zoom in of the new title block after the DISPLAY menu option has been pressed.
In order to do gridding, when we are at this dialog box (accessible as MENU/edit/edit posting specifications) press the "Display Data Range". This will read the data file and determine the limits of the data and bring up a new dialog box.
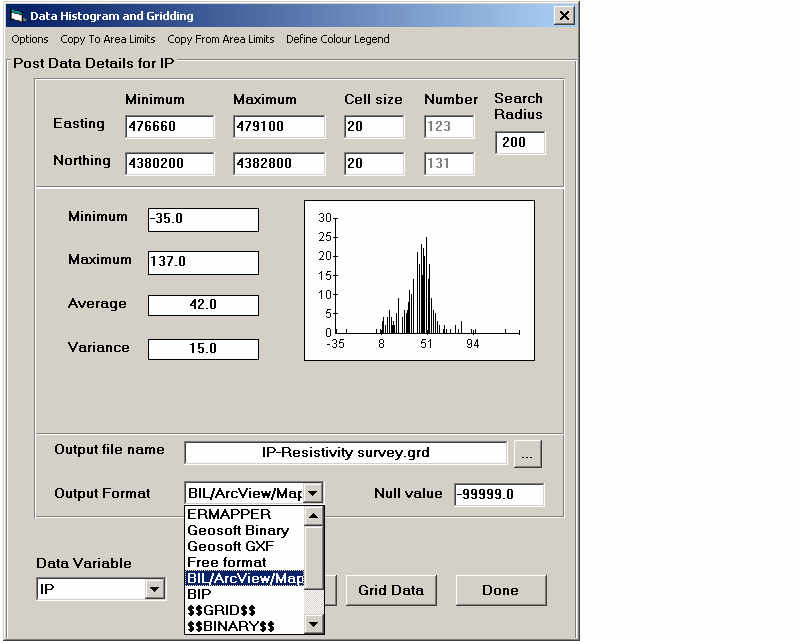
The dialog box to define grids. Important things: Cell Size, Search Radius (this is not the actual search radius in the gridding algorithm but is really just the blanking distance or the distance from points to where the grid becomes nulls.). Also of importance is the grid name, the output format, and the data variable. For ouput format, the common options are BIL/Arcview/Mapinfo and Geosoft. Geosoft is a simple grid format while BIL/Arcview/Mapinfo make image files.
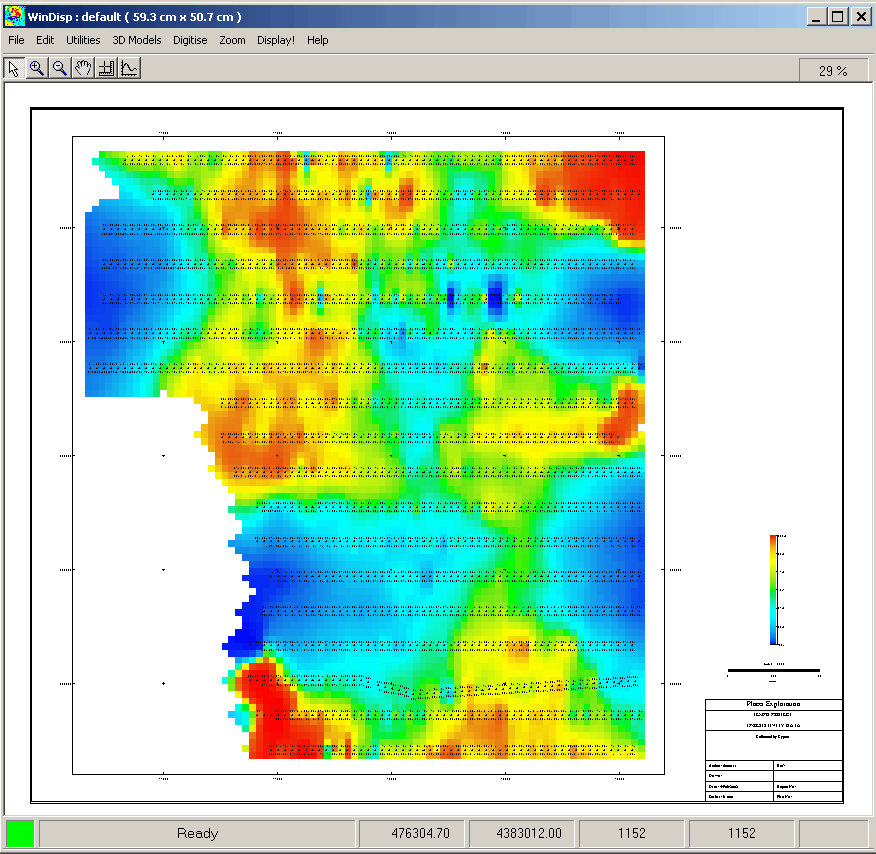
After making a "BIL/Arcview/Mapinfo" image, we can run the "DISPLAY" option in the main menu to see the image.
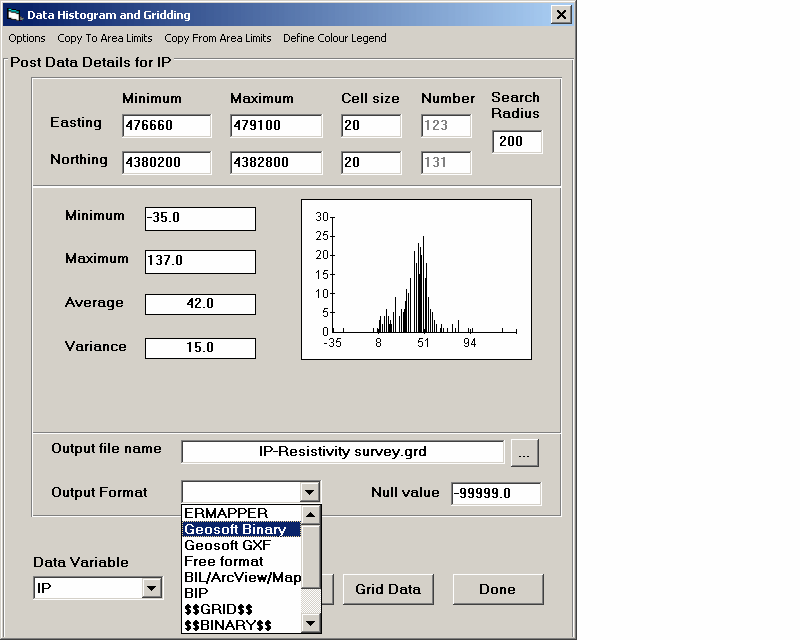
Going back to the EDIT / EDIT POSTING SPECIFICATIONS from the main Windisp display we get this dialog again. This time select Geosoft Binary as the option.

Now that a geosoft grid has been created, we can display it through EDIT/IMAGES.
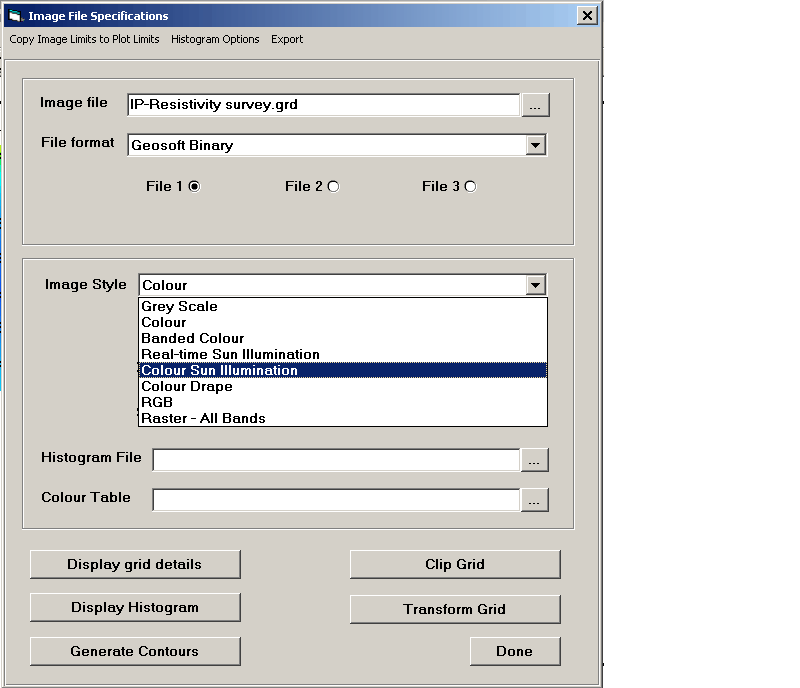
Now the images dialog allows us to display a sun shaded image. The sun angle can be defined and those options are covered in this screen snap shot.
Once again, "Display" redisplays the image showing the changes made and the sun shaded image is created.
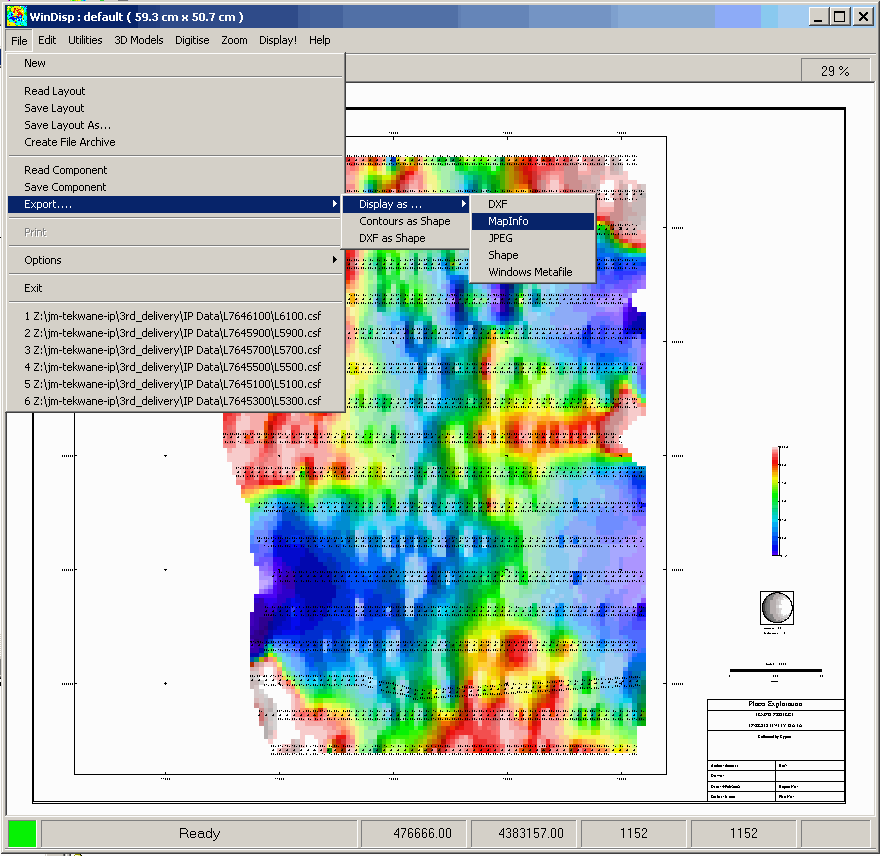
To make GIS files, select File/Export/Display as/Mapinfo. Arcview bmp will be made as well as a TAB file. A DXf will also be generated.
4: Notes on Datum and projection transforms for Grids and Databases in WinDisp
Datum and projection transforms for Grids and Databases in WinDisp
Notes prepared by Vicki Thomson and Peter Kowalczyk
5: Converting latitude/longitude data to metres for posting or gridding
(1) When WinDisp starts (or from Edit > Posting > Select Posting File)
choose "Post data" (from text file, for example - this includes a
Geosoft XYZ).
(2) Go through "Data File Specification" window assigning "First Line
with Data" and "Line with Data Names" (note here that in a Geosoft style
XYZ file, the line numbers are included in the data lines, so for
example / Line 1 will be the first line with data.
(3) Go through "Specify Data Names" window, changing null values or
variable names if you wish.
(4) Select "Data Posting Style" (this only affects the display, and for
gridding purposes makes no difference).
(5) The "Data Posting Coordinates" window is the important part: choose
"Decimal degrees" under "Coordinate Style" and specify the "Input zone"
(e.g. 36 for Tanzania). Now click "Define Projection and Datum
Transform". Fill in "Projection" and "Spheroid" information from
drop-down menus - make this the desired output coordinate system even
though it says it is for source data. For example, use UTM and spheroid
WGS84, or else UTM and spheroid Clarke 1880 for the Arc1960 system. Fill
in "Zone Number" and "Hemisphere" and click "Done". Back in the "Data
Posting Coordinates" window, if you already have WinDisp set up in
another coordinate system, untick the box "Use same projection as
current layout". Now specify the longitude variable as "X Variable" and
the latitude as "Y Variable". If the file is Geosoft style XYZ with line
numbers as / Line 1 etc, then check the box "Geosoft Line Definition".
Click "OK".
(6) In the "Data Posting Specifications" window, choose the variable you
want to post in the drop-down menu under "Name of Data Variable", and
click "Display Data Range". You should see the Easting and Northing
limits expressed in UTM for example rather than decimal degrees. Click
Copy Limits > To PLot Limits to automatically set the scale for
displaying the data. You can grid the data in UTM coordinates in this
window, or return to the main WinDisp window and click Display to post
the data.
6: Reprojecting a grid into a new datum
1. Start WinDisp and display the image in the target projection (eg UTM/GDA zone
56S)
2. Click on the Edit> Images menu item and then click on the Transform Grid
button
3. Change the Current Grid coordinates to Grid
4. Ensure that the Use same projection as current layout is turned on
5. Click on the Define Projection and Datum transform button
6. Change the Source projection spheroid to the one desired (eg Australian
National Spheroid zone 56)
7. Click on the Datum Transform drop-down list in the Optional Datum shift box
and select the required data from the list (eg AGD84 to GDA 94). If the datum
transform is not in the list, simply type in the name and parameters on the
form.
8. (Optional) Click on the Test Transform button, enter the coords to test as
East/North coords, click on the East/North to Lat/Lon button to see the
geographic coords, then click on the Convert Source to Map button to convert to
GDA geographic coords and finally click on the lower Lat/Lon to East/North
button to convert to MGA east/north values. Then click on Done to go back to the
projection form.
9. Click on Done to return to the transform form, specify the desired x/y cell
sizes (generally the same as the source grid)
10. Specify an output grid file name and format and click on the Perform
Transform button
11. Select the new grid file created and click on the Copy Limits to Plot limits
menu item
12. Click on Display and the new grid file will be displayed
7: Converting SRTM grid files
The data is available in 1 x 1 degree blocks at ftp://e0mss21u.ecs.nasa.gov/srtm
srtm conversion and proceed as follows:
1. Start a new layout and select Display an image
2. Select the srtm file to convert
3. Click on the Copy Image Limits to Plot limits menu item
4. Click on the Transform Grid button (no need to display the image)
5. Select Convert Geographic grid transform and turn off the Use same projection as current layout (as there is none)
6. Click on the Define Projection button, select UTM and GRS80 as the spheroid
7. Specify an output grid file name and format
8. Specify an output grid cell size
9. Click on the Perform Transform button
The resulting grid looks ok and does not have any datum shift applied, but I don't have any independent data to confirm that it is correct. But I can confirm that the datum shift part of the code is not being used as I have not define a datum in the above steps.
The latest version of WinDisp will calculate an output grid cell size if you don't specify one, but specifying a value will make sure that the grid is reasonable
8: Upward continue a grid file
1. Start WinDisp, double click on the Display an Image option, select the
required grid file and the Image File Specifications form will be displayed
2. If you want to view the image before transforming it, select the required
Image Style, click on Done, enter the required map scale and the image will be
displayed
3. If you displayed the image in step 2, click on the Edit> Images menu item on
the main WinDisp form to display the Image File Specifications form
4. Click on the Transform Grid button to bring up the Grid Transformations form
5. Click on the Transform Using dropdown list and select the required transform
(Continuation for this case)
6. Turn on the FFT checkbox if required. If the FFT is not turned on, the
transform will be performed using a convolution filter. This is faster than the
FFT, but has different frequency response characteristics as it is not sensitive
to the longer frequency content in the image.
7. If you have the FFT option turned off, specify the filter half-width for the
convolution filter. If you have the FFT option turned on, specify the Edge
roll-off half-width value. The latter is the minimum number of padding cells
which are to be added at the edge of the image before the grid size is increased
to the next larger power of 2 for performing the FFT.
8. Decide what form of detrending is to be applied to the grid. The options are
No detrend, Remove Detrend and Remove and Restore Detrend. The Detrend option
(if applied) calculates a planar fit to the data at the edges of the image.
Removing the planar detrend can reduce artefacts introduced by the FFT due to
discontinuities due to the implied periodicity of the data. Restoring the
detrend is only useful when working with smoothing transforms for data like
elevations.
9. Specify the Continuation distance. This value is in distance units (not cell
counts) and is positive for upward continuation and negative for downward
continuation.
10. If you wish to save the grid file, specify an Output file name and format.
If you do not specify an output file name, the transformed grid is kept in
memory as the current grid file. This allows you to perform multiple transform
operations, view the results and then save the final grid.
11. Once all of the required parameters have been specified, click on Perform
Transform and the requested transform will be computed.
12. Once the transform has been applied, click on Done to return to the main
Image form. If you did not specify an output file name, you can click on Done
again and then display the transformed grid.
13. If you did specify an output file name, you can select the transformed image
on the Image Specifications form and then display it
14. If you have a transformed image in memory that you wish to save, click on
the Export menu item on the Image Specifications form, select the required grid
format, specify an output file name and then click on the Store Grid button on
the Grid Output form.
15. If you have a transformed image in memory that you do not want, click on the
Release Loaded Grids button to remove the transformed image and return to the
original grid file.
9: Multi-level continuation
1. Start WinDisp and display the gravity image (just to see what it looks
like)
2. Click on the Edit. Images then the Transform Image button, turn on FFT, set
filter half-width to 11
3. Set the minimum distance to 0, maximum to 2000 and increment to 100 (or
whatever values suit you)
4. Specify an output file name and click on Perform Transformation
5. Select Yes or No according to whether you want the worms to go up or down in
space
6. Click on Done and Done again to get back to the main WinDisp form and click
on the 3D Models menu item
7. Load the mesh and model file you just created
8. Set the blue/red and isosurface values to something reasonable and click on
the Start 3D Viewer
9. Leave the viewer open, go back to the 3DModeller form and click on the Data
Files tab on the 3D Files tab
10. Double-click on the first line, select the extrema.dat file, set the First
line to 2 and the name line to 1
11. Turn on the Colour Using check box and click on the Colour column box and
select grad from the list
12. Click on the Local locations button to check that the data is being read ok
13. Click on Done and then click on the Create New 3D object menu item
14. Specify a name for the new display item (eg extrema) and then click on Done
and the points will be displayed
15. Once you have created the model, click on File> Save binary model and save
the model file
16. On the 3DModeller form you can also click on File> Save model layout to save
the definitions used for creating the 3d model
10: Processing data from Geosoft TEM gdb files
VTEM Geosoft Databases
Converting and displaying a Geosoft VTEM database
Converting and displaying CDI grids from a Geosoft VTEM database
11: Converting CDI array data in a Geosoft database to CDI Grids
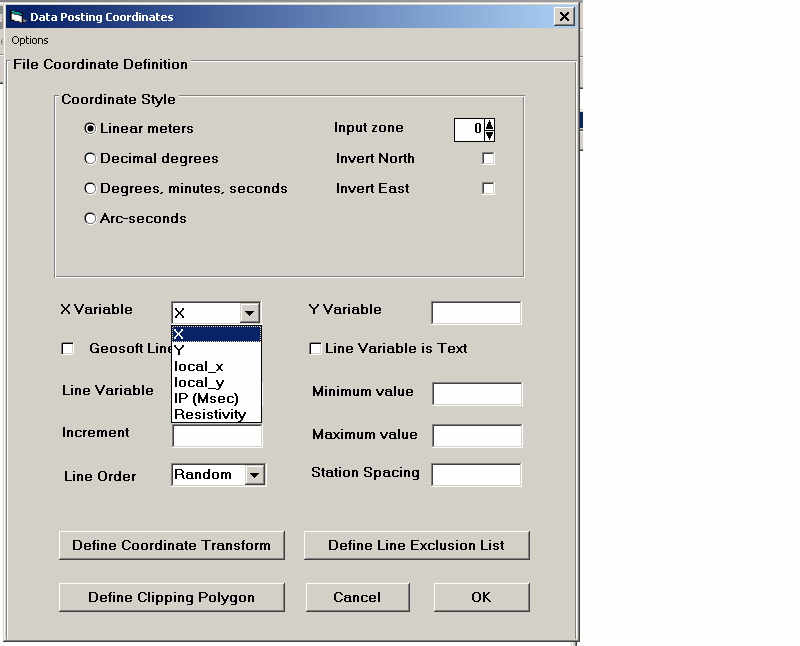
1. Start WinDisp and double click on the Post Data from a Geosoft Database
option
2. Select the required gdb file (NB you have to have the Geosoft API installed.
The install set is on the main downloads page http://www.scicomap.com/downloads.htm)
3. Click on Done on the File Display form and the Data Names form will be
displayed
4. Click on Done and the Posting Style form will be displayed. Leave the style
as Value and click on OK
5. The Data Posting Coordinates form will then be displayed
6. Select X as the X variable by clicking on the text box and selecting X from
the list
7. Do the same to select Y as the Y variable
8. Select LineNumber as the Line Variable and turn on the Line Variable is Text
check box
9. Click on OK and the Data Posting Specifications form will be displayed
10. Click on the N/A in the first line in the Data Variable list and select Z as
the value
11. Click on the second line and select Alt as the value
12. Click on the Display Data Range button and the data will be read from the
database and the limits displayed.
13. Click on the Copy Limits> To Plot Limits menu item and specify the required
plot scale (note that you can modify the x/y limits before copying them to make
the plot area a little bigger)
14. Click on Done and then on the Define Data Variable button and change the
Label Size to 0
15. Click on the drop-down list at the bottom left side of the form and select
the other data variables and change the label size to 0
(Note that steps 14,5 are only necessary if you are going to display the plot as
the labels get too cluttered for this dataset)
16. If you want to check the flight lines, click on Done, OK and then Display!
17. If you displayed the plot, click on the Edit> Posting> Edit Posting
Specifications to bring up the posting definitions form
18. Click on the Options> Generate CDI grids menu item to display the CDI grid
output form
19. The File name is ignored at the moment, so ignore it
20. The Start X,Y and Line azimuth fields can be left blank, but can be filled
in if you need to
21. Select the Z as the DTM field by clicking on the text box and selecting it
from the list
22. Select Alt as the Alt field
23. You can select Depth1 as the field defining the layer depth, but in this
case all layers are 10m thinck, so just change the Layer Thickness text box to
the value 10
24. Select Conductance1 as the Data field and change the Data type to be
Conductnace
25. Set the Z and X cell sizes to be 10, the Max Depth to be 800 and the Depth
Clip Method to be Draped from DTM
26. If you want to use the xyz data for gridding in another program turn on the
Output xyz data using uniform samples option (if the checkbox is turned off, the
xyz data is only output for each layer)
27. Turn on the Output NN gridded images (where NN is Nearest Neighbour - which
is the only option at the moment)
28. Turn on the Output station based images and select whichever of the res, log
res and conductivity images you want created
29. Click on the File> Save setting menu item and write out the definitions
(these can then be loaded in the next time you run the process)
30. Click on the Output Data button and the data will be read and the images
created. Each line in the database is processed separately and the files are
written to a separate folder for each line
12: Displaying the CDI sections in 2D
1. This is pretty similar to the 3D display, but first save the current CDI data
posting layout and then click on the File> New menu item
2. Double click on the Start New Layout option
3. Click on the Edit> Multi-panel Display/TEM profile menu item to display the
Multi-panel list
4. Drag and drop the sct files on to this list
5. Once all files have been added, click on Done, specify the Plot Scale and
then click on Display!
The coordinates used for the CDI grids depend on the option you chose on the CDI
grid creation form. If the lines are almost EW or NS (as your lines are), you
can choose the Coordinate based option and the most appropriate coordinate will
be chosen (in your case this would be the northing). For oblique lines it's best
to use the station based grids. The station is calculated by subtracting the
Start X/Y coords from the CDI gridding form from the actual x and y coords and
then rotating by the negative of the line azimuth. The resulting x coordinate is
used as the station value. Doing it this way means that the 2d grids can be
lined up correctly, though this is less important in the 3d display.
13: Calculation of the gravity terrain correction
Load a dtm grid as the topo grid on the 3DModeller form (3D files> Topography)
Define the observed data points as 3D points (3D Files> Data Files and click on
the Add new file button)
Click on the Load Locations button to read all the points
Click on the Calculate Terrain Correction and enter the desired parameters for
the calculation:
density contrast: this value is used to calculate the total Bouguer using the
FreeAir data column loaded as the Colour column (ignored otherwise)
Average topo elevation: this value is used for the infinite slab part of the
calculation. If it is -1e32, the average dtm value will be used. You only need
to set the value if you want to calculate the TC for multiple separate surveys
in the same area
Zone width: This is the width of the padding area around the survey data and is
used to speed the calculation for areas of the dtm remote from the survey data
(500 seems to work reasonably well for standard surveys)
Insert observed locations into topo: turn this option on to ensure that the dtm
used for the response calculation matches the survey data points
Topo DC shift: This is a simple DC shift which can be used to ensure that the
dtm elevations match the survey data elevations
The program will then calculate the total Bouguer value and writes it out to a
data file.
Notes:
If you select values for the Colour By and Size by, these are also written to
the file. Selecting the Free air value is useful as the total Bouguer value is
calculated for the specified density and written to the output file.
The average topo can be left as the null value (-1e32) and the program will work
out the average topo for the grid and use that. If you want to compare different
surveys in the same area which have different topo grids, then the average topo
will be different for each and there will be an offset between the terrain
corrections for each survey. In this case, you should set the average topo to a
reasonable estimate and use the same value for each survey. The value should not
be zero as it is not the datum for the survey, but rather the height of the
infinite slab used outside the region covered by the terrain grid.
The observed data points should be close to the dtm surface as any discrepancies
between the two cause large differences in the total Bouguer.
The dtm grid file should be large enough to provide terrain information around
the survey (at least 8 cell widths is adviseable).
The first three columns in the output file will be x,y,z. Next are any data
columns loaded as colour or size fields. Next is the total response for the
topo, followed by the Total Bouguer if a colour field has been specified. If the
Map onto topo option is used, there will be a final column with the elevation
shift at the obs data point.
The computed value is the total Bouguer and is applied in exactly the same way
as the Bouguer value ie multiply by the density and subtract from the free air.
A full TC using the full resolution of the dtm grid can be calculated by setting
the zone width to 0.
If a draped image grid is specified in addition to the topo grid on the
3DModeller form, it can be used either as a regional topo grid (for areas where
the topo grid is not defined) or as a variable density grid.
14: Displaying resistivity and IP pseudosections using a consistent colour stretch
1. Start WinDisp and open one of the pseudosection displays for an IP line
2. Click on Display! to check that you have the pseudosection that you need
3. Click on the Edit> Posting> Edit Posting Specifications menu item
4. Click on the number 2 in the list of data variable (should be the line that
says Chargeability)
5. Click on the Define Data Variable button
6. Click on the Edit Image button
7. Click on the Display Histogram button
8. Change the Minimum Value to 0 and the Maximum value to 20 (or whatever
maximum is appropriate for the data)
9. Click on the Histogram Distribution drop-down list and select Uniform
10. Click on the Update Histogram button
11. Click on the Histogram Options> Save Histogram menu item and save the
histogram file somewhere that you'll remember and use a name something like
IP_0_20.hst
12. Click on The Done button to close the Histogram form
13. Click on the Done button to close the Image form
14. On the Posting Variable form, click on the button next to the Histogram File
text box and open the histogram file that you saved
15. Click on Done and then OK and then Display and check that the IP section
looks ok (ie the image should go from Blue to red)
You can repeat this process for the resistivity section by selecting the number
1 in step 4. For resistivity values you should set the minimum value to be a
nice round number smaller than the current minimum. For example if the minimum
is 43.1, change it to 40, but if the minimum is 4.3 change the minimum to 1. But
always make the minimum some positive number. Similarly for the maximum, change
it to a larger number which encompasses the range of resistivity values for all
of the lines eg if the maximum is 782 then change the maximum to 800. Then
change the Histogram distribution to Log (and not Uniform), click on the Update
Histogram button and save the histogram file using a useful name.
Once you have set up the histograms for the resistivity and chargeability for
one line, save the specifications using the File> Save Layout menu item so that
the changes to the histogram are remembered. For the rest of the lines, you can
then just open the pseudosection display using the File> Read Layout menu item,
click on the Edit> Posting> Edit Posting Specification menu item, click on the
number 1, click on the Define Data Variable button, click on the Histogram File
button, select the saved resistivity histogram file, click on the Done button,
then click on the number 2, click on the Define Data Variable button, click on
the Histogram File button, select the saved chargeability histogram file. Then
click on Done, OK and then Display! and check the display. Then click on the
File> Save Layout to save the changes.
Repeat this process for all of the lines in the survey to make sure that the
images all look ok. Then once you have made sure that the ranges for the
resistivity and chargeability are ok, go back and display each of the IP lines,
click on Display!, then click on the File> Print menu item, click on the
PDF/PostScript option. change the Page Size to Plot Limits, click on the Print
button and save the pdf output. Then send the client the saved pdf files.
15: Displaying IP pseudosections in WinDisp
The IP posting is based around a single IP line and although it is possible
to add grid files from other lines, it is best to keep it for the single
line. Instead there is another display mode where you can set up multiple panels
in which you can display up to 64 different images.
To use this mode proceed as follows:
1. Start WinDisp and start a new layout
2. Click on the Edit> Multipanel/TEM display menu item
3. Click on the Define panel contents button (or double click on the number for
the first blank line)
4. Click on the Image and Topo tab
5. Select the required image and display style and click on the Set limits from
Image file button
6. If required, click on the Area Limits tab and change any limits and panel
labelling options
7. Click on OK and repeat steps 3 to 6 for the required number of images
8. On the main multi-panel tab click on the Panel Header for each panel and
change the headline text as required
9. Click on the Column to Use value and change the column as required
(panels are displayed from top to bottom in the layout using the column
number to determine the lateral position of the panel)
10. Change the Row and column alignment drop-down selections as required
11. Click on Done and specify a map scale if prompted and then Display! to show
the layout
In this mode and individual images, posting and overlays are ignored and not
displayed. Similarly the area limits are ignored, but plot scale and projections
are used. Also you can add a pre-existing posting layout as a panel using the
Posted Data tab. Similarly, you can add contours, DXF and shape/mapinfo overlays
over posted data or images.
I generally show inversions for multiple lines using the multi-panel option with
the northernmost line at the top and resistivity in column 1 and chargeability
in column 2. I have also set up multipanel displays for the IP inversion posting
displays, but for these, I split the IP inversion layouts into separate res and
chargeability displays (by taking the standard mod layout and deleting either
the res or the chargeability and saving it as a new layout) as then the
coordinates will line up correctly in the data columns.
There is also an IP batch processing utility with which you can set up a
wizard file for one of the lines to be processed and then adding all of the
remaining lines so that they all get processed in the same way. I have not yet
added the res2d files to this option, but it does work for UBC and Zonge
inversion files.
16: Creating a 3D UBC model from xyz data
1. Start WinDisp, click on OK to start a new layout, click on the 3DModels
menu item
2. Change the Model type in the dropdown list on the Mesh/model tab to
resistivity (even though you don't have a model loaded)
3. Click on the Observed data tab and load up the xyz file that you want to work
with
4. Set the number of header lines, the name line to whatever is appropriate and
ensure that the X,Y and Z coords are specified correctly
5. Turn on the Colour using value option, click on the Colour Column text box
and select the resistivity data column from the drop-down list
6. Click on the Load Locations button
7. Click on the Start 3DModeller button, specify a world plot scale and
check the display of the points
8. Go back to the 3DModeller form and click on the 3D Gridding> Observed data
point menu item
9. Supply a name to give the gridded model (without an extension of res) and
click ok
10. Specify a horizontal search radius and vertical search radius values and
turn on the Maintain positivity option and click Done
11. follow the prompts, (choose No to the binary format question if it
appears) and the mesh and model will be written out and then loaded
12. load the topo grid on the 3D Files, Topo grids page
13. go to the display model tab and change the x/y padding cells as required to
chop off the padding cells
14. Click on the Edit> Topo> Specify model above topo option and
enter -99999 to mask the gridded model above the topography
15. Click on File> Save model to save the trimmed model (optional, but saves you
having to repeat the process next time you load the model)
16. Set the red/isosurface value to whatever level you want
17. If you have closed the 3d viewer click on the Start 3D modeller button,
otherwise click on the Create new 3d object menu item and give the isosurface a
name (eg Res 1000)
17: Importing IP data into TQIPdb
1. Start the program and click on File> Create a new database
2. Click on the Import Data> Field data menu item and select the required dump
file to import (it will also import Geosoft dat files, but the naming convention
for the columns has to be right)
3. If the file format is recognised, the file will be scanned and decoded
using the current import settings
4. If the file wasn't decoded correctly, change the settings on the file
format definition part of the form and click on the Scan File button. The main
ones to change are the Array Type and Tx Current fields. You may also need to
change the Pole-dipole or Gradient settings (if relevant) and the Tx and Rx line
numbers if they have not been decoded correctly from the file.
5. The main fields to check in the file scan window are the Tx and Rx line
number, the electrode coords and the Res and Mx values.
6. Once the data is ok, click on the Import Data button. The file will then be
rescanned and you will be prompted to provide a location where the data should
be stored. The data is stored using a tree structure and I set up default nodes
in the database, so if you have pole-dipole data, you just need to click on the
Pole-dipole node in the list and click on Done and the program will create a new
node under the Pole-dipole node with the line number for the data you are
importing and store the data there. If you then import another dump file for the
same line, you still click on the Pole-dipole node and the program will append
the new data to the existing line. Once the data has been imported, the program
tries to work out the conversion between local and world coords (which is a bit
meaningless for most data files, and I'll probably take this out in the next
version and put the check in somewhere else). Just click on OK if it asks you
about transform defintions.
7. With the data loaded in the database, the node list and plan view maps are
updated. To see the data for a line in the database, just click on it in the
node list at the top left.
8. When you click on the line, the plan-view will show you the latout of the
plot-points and electrodes and the pseudosection view will show you a simple
pseudosection plot.
9. If you click on a point in the pseudosection, it will display the decay
curves of all repeats for that point.
10. You can change the colour range for the pseudosection plot by clicking on
the Database> Set Plot Defintions and clicking on the Psudosection tab. You can
also bring up this form by clicking on the middle button in the navigation
panel.
11. You can navigate through the pseudosection using the navigation buttons of
the keypad buttons (a full list of the navigation keys can be viewed by clicking
on the Help > Keycodes menu item.
12. You can turn individual repeats on and off by clicking on the repeat
number checkbox next to the decay curve plot.
13. You can edit individual points on the decay curve, by clicking on the bad
point and dragging it up or down. If you change a decay cure, you have to click
on the Save button above the repeat list or the changes will be discarded when
you change repeats.
14. You can move a decay up or down by holding the Shift key down while dragging
the point.
15. Turning of a decay only turns of the chargeability value and not the
resistivity. To turn of the resistivity, click right on the point in the
pseudosection, scroll to the relevant repeat and turn off the Use Res
check box or the Use data check box (for both res and Mx).
16. Once you have loaded and reviewed your data, you can output the data by
clicking on the Output Data menu item to bring up the output form. On this form
you can specify the output format and also filter the data selection for the
data to be written. Hopefully the form is clear enough to be self-explanatory,
but let me know if you have any questions.
18: Importing Topo data into TQIPdb
The topo file format is basically pretty simple, but there are a lot of
nuances that can cause complications for me on the database side.
The simplest is to have a data file with three columns - Line, Station,
Elevation. eg
Station, Line, Z
1400.0, 6500N, 755.0
1450.0, 6500N, 650.0
1500.0, 6500N, 630.0
1550.0, 6500N, 645.0
...
With a file in this format, click on the Import Data> Locations menu item,
select Line/station as the import style, set the first line as 2, line
containing names as 1, Line column as Line, Station column as station, leave the
Geosoft option turned off, Line Number text box blank and Line is Local N
selected. Then select Elevation to be Z, click on the Scan File button and then
Import data.
There are lots of variations possible. If you have line numbers in Geosoft
format (ie there ate lines of the form Line 6500 in the file), then select the
first such line as the first data line, turn on the Geosoft Line header option
and then import the data.
If you only have data for one line in the file and no line number column, turn
the Line number column off (and also Geosoft line option off), enter the actual
line number in the text box, scan and then import the file.
Line numbers can have a NSEW suffix or not. If there is no suffix, the line
direction is determined by the Line is local N or Line is local E option and the
sign of the line value determines whether it is N,S E or W. eg if the Line is
local E and the line number in the file is -850, then the line will be 850W.
When the Line/station values are read, they are decoded and converted to a local
X/Y coordinate value (eg 1400, 6500N converts to the X/Y coord (1400,6500)).
These are the base coordinates used for displaying the data. If there are real
world coordinates to go with the electrode locations, you can also specify the X
and Y coord columns. These are interpreted as map coordinates and can be used
both for displaying the electrode locations and for exporting to various
inversion formats.
19: Batch IP plotting Utility using TQIPdb output
The new TQIPdb has an option to export individual line files to separate directories when writing out Geosoft dat files and All Lines is selected.
I created a separate directory (CLP and CGP) for each reading sense.
The new TQIPdb also creates an ipb file with a list of the data files and basic information to be included in the legend.
Once data is exported, start WinDisp and display the combined IP data file (for all lines) to set up a composite histogram for the res and IP grids
With the combined IP pseudosection display loaded in WinDisp, click on the Utility> IP Batch Processing menu item.
Click on the File> Read Batch setup> All definitions menu item and select the ipb file created by TQIPdb
Click on the File> Read IP Wizard settings and read the wiz file created when the combined IP pseudosection was created (note that you can also click on the Add Files button to select files or drag files from a File Explorer window to create a new file list) from scratch)
Click on the Define Files button and fill in the missing information (or modify existing values). Clicking right on the labels on the form brings up a Copy to All popup menu which copies the current value to all defined files. Using the Copy All button at the top of the form copies all values for the current tab to all defined files.
Scroll through the list to make sure all the definitions are ok.
Click on the Define Title button to fill in the title information
Click on the File> Save Batch setup to ensure that the current settings have been saved
Turn on the Create PDF output (if you want pdf files to be created)
Click on the Process Files button to generate the IP psuedosections and pdf output
Click on Show File List (if the file definitions are displayed) and then click on Done
Notes:
turning off the check box for a file means that that file will be skipped
turning off a checkmark on the file definition display means that that item will not be included in the plot
there are still some improvements that I need to make to the code (especially when you close the form and then open it again), but I've run out of time
the display that was current when the IP batch form is loaded will no longer be valid when you close the batch form and you may also not be in the same directory
the ipb reading code does not check that the IP file actually exists (as the file contains an absolute path), so if you need to run the batch process on your own computer, you may need to edit the wiz and ipb files to correct the file paths
20: Plot the IP pseudosections using the topo data
Just set up the IP pseudosection display with a topo profile panel and then turn on the Drape IP under topo check box on the posting form. The first defined topo section to use for draping.
If you just want the IP, click on the Edit> Posting> Edit Posting
Specifications and turn off the panels that you don't want. You may also have to
change the Column number from 2 to 1 so that it gets plotted at the left.
Ditto for the inverted res and IP sections. Note that you simply delete the
panels you don't want by left clicking on the number in the list of variable and
then right clicking and selecting Delete from the pop-up menu. You can also do
cut/paste this way to reorder the panels.
The size of the topo draped IP panel is set using the min/max topo values from
the first defined topo panel. So double click on the Topo panel in the variable
list and then change the min/max values as required.
21: Plot a soil geochemistry profile in an IP panel display
If you want to plot a profile of the soil geochemistry in
the IP panel display, then proceed as follows:
1. Start WinDisp with the IP panel display
2. Click on the Edit> Posting> Edit posting specification menu item
3. Click on the first blank panel and select the last item Topo File/Model image
item in the drop-down list
4. Click on the number of the panel that you have just defined and click on the
Define Variable button
5. Select the geochem profile data file as the topo file (note it must use the
same coordinates as the IP data)
6. Click on the Set Topo File Format, set the Line number column to 0, the along
line coordinate as the same as the IP coordinate
7. Set the elevation column as the required assay column and then click on the
Calculate Statistics button
8. Since the assay value is plotted at the same vertical scale as the depth, you
may need to change the Scale value to get a reasonable range in the display
9. Click on the Done button and then click on the Set Limits from topo file
button to calculate the vertical range for the panel
10. Change the min/max elevation values as required and specify the Data legend
and Axis labels to text appropriate for the assay values
11. If you want to plot multiple profiles, repeat the steps 3 to 10 to add
another profile display and change the Display In value to the panel
number where you want the multiple profiles to be displayed.
22: Converting a SEG-Y File
The latest version of WinDisp now provides a means for converting SEG-Y seismic files to a form which can be used in normal displays or in the 3D Modeller.
To use it, start WinDisp as usual, start a new layout, click on the Utilities> SEG-Y File Utility menu item to bring up the SEG-Y File form:
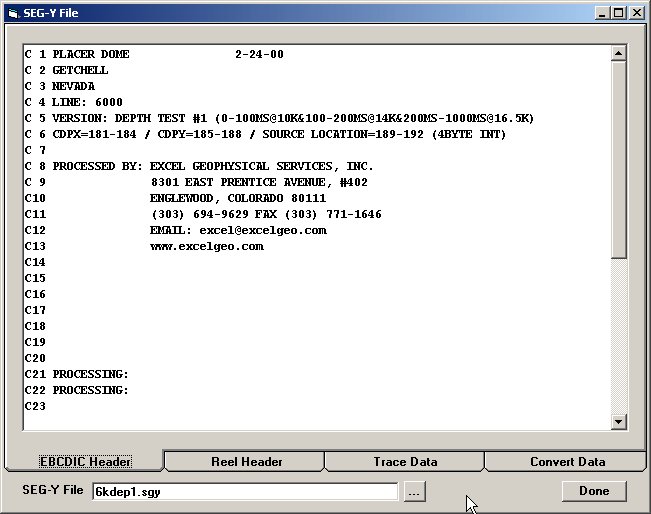
Click on the File Selection button at the bottom of the form, navigate to where you have stored the SEG-Y files and select the file of interest. Once the required file has been selected, the program scans the file to ensure that the format is valid. Currently WinDisp only supports files which contain a standard 3200 byte EBCDIC header followed by a 400 byte reel header followed by multiple trace records. The trace records may optionally contain a trace header, but they must all be of the same length.
If the file has been decoded successfully, click on the EBCDIC Header tab to display the header:
Click on the Reel Header tab will display the Reel header:

Click on the Trace Data tab will display the Trace data records:
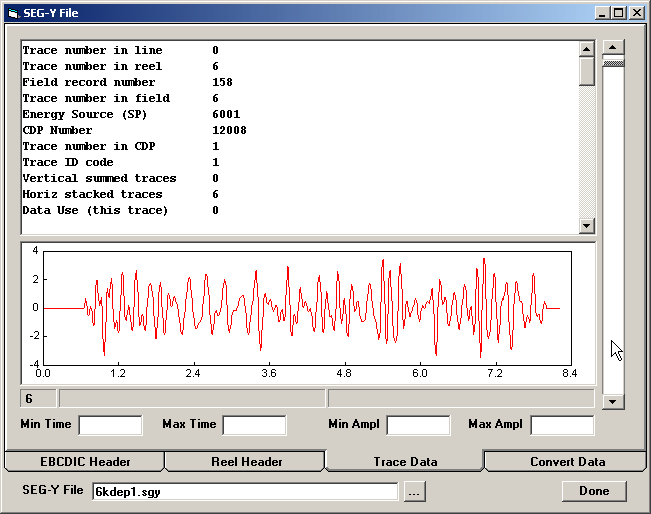
This form displays the Trace header in the top part of the form and the converted trace data in the bottom part of the form. To facilitate the examination of the traces, you may set the minimum and maximum times to be displayed and the minimum and maximum amplitudes. The scroll bar at the right of the form can be used to select which trace to display.
When the mouse is moved in the trace graph, the first panel in the status bar displays the trace number, the second panel displays the delay time and the third panel displays the amplitude.
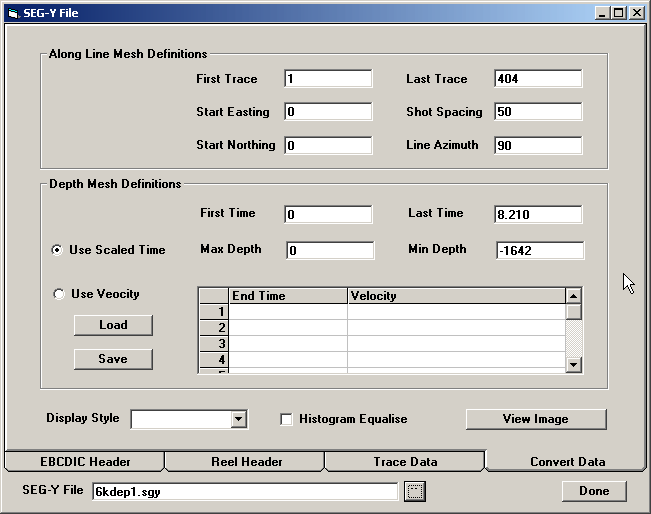
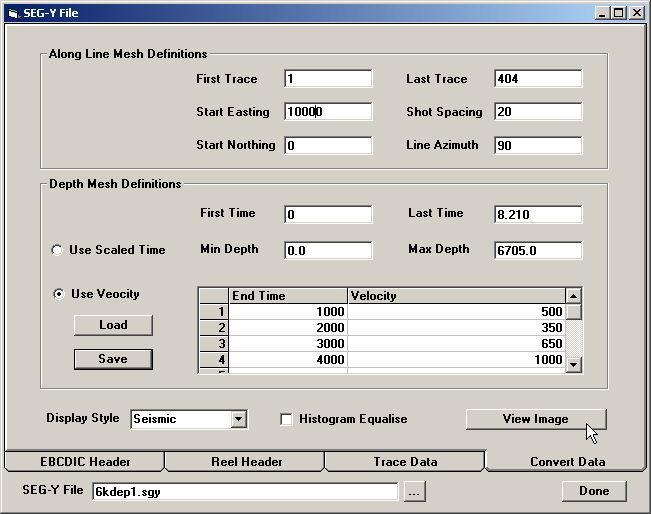
Once you have verified that the data has been decoded correctly, return to the Convert Data tab. This form has a number of data values which you need to sepcify in order to convert the seismic data to a usable form.
First Trace
Use this value to select the first trace to export. The default (and minimum) value is 1.
Last Trace
Use this value to specify the last trace to export, The default (and maximum) value is the number of traces read from the data file
Start Easting
This value specifies the start grid coordinate to be assigned to the first exported trace
Shot Spacing
Use this value to specify the separation in m between consecutive shot points. Note that it is assumed that the shots are uniformly spaced and recorded in order in the SEG-Y file. The SEG-Y file does have information about the actual shot locations, but this appears to be generally unreliable, so is not used at present.
First Time
This value specifies the first time slice to be exported. The default (and minimum) value is 0. The SEG-Y file may contain information that can be used to determine the actual time delay for the first time slice, but this information is not used at present.
Last Time
This value specifies the last time slice to be exported. The default (and maximum) value is the total number of time slices times the sample interval.
Use Scaled Time
Select this option to perform a simple time to depth conversion. If this option is selected, you need to specify the minimum and maximum depths for the exported minimum and maximum times:
Min Depth
This is the depth associated with the first time slice to be exported. When the export grid is generated the depth is converted to elevation (ie multiplied by –1).
Max Depth
This is the depth associated with the last time slice to be exported. When the export grid is generated the depth is converted to elevation (ie multiplied by –1).
Use Velocity
If this option is selected, you need to specify the velocity-time transform function. To do this enter the end-time for each slice (in milliseconds) in the first column of the velocity profile grid and enter the corresponding velocity (in m/sec) in the second column. Keep entering end-times and velocities for all bands that you wish to specify. If the last end time does not cover the full trace, the last specified velocity band is extended to cover the entire trace duration. The start of the first time band is assumed to be at 0ms delay.
Save Velocity Profile
The values you enter on the Velocity Profile Grid will be lost when the form is closed. To save you having to reenter this information again, click on the Save Button and specify a file name to save the velocity profile.
Load Velocity Profile
Click on the Load button to read a previously saved velocity profile function. Select the file to read and the values in the file will be loaded onto the velocity profile grid.
Here is an example of what the form will look like with the above values specified:
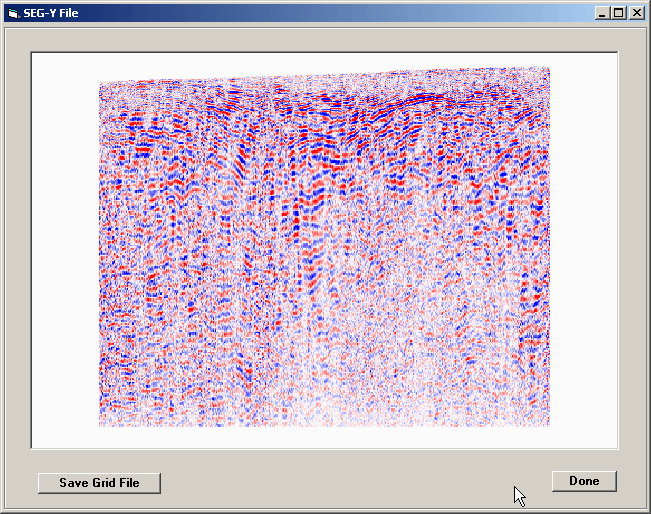
Once all the required information has been specified, click on the View Image button and the data on the form will be check and then used to convert the trace data to a grid file:
If the grid is acceptable, click on the Save Grid File button, specify a file name and location and the seismic data will be written out a Geosoft binary grid file. This grid file can then be displayed in the usual way in WinDisp or loaded up as a vertical section in the 3DModeller.
To help in assessing the grid file, the Display Style list can be used to select Seismic, Colour or Greyscale. The seimic option is illustrated above with red assigned to hign, blue to low and white in between. The colour option is the usual blue to red rainbow and the greyscale option is the usual black to white.
The Histogram Equalise option can be used to perform a colour stretch on the image to highlight low releif feature in the image.
Note that the Start Northing and Line Azimuth values are not used in the current version, but will be used for generating VRML output in the next version.
23: Use the interpretation features to build a UBC model
1. Start the 3DViewer with the mesh and model file (if you have one)
2. Click on the Interpretation> Create New Modelling Node menu item and specify
a name for it
3. Specify the name of the mesh file that you want to use for creating the UBC
model
4. Optionally add the topo, mag and grav grids
5. Click on the Define Rock Types menu item and define the types of rocks you
may want to model (sample file attached)
6. Click on Done to go back to the 3DViewer form
7. Add the interpretation features to the modelling node and use the lookup
table to specify the rock type (click on the Copy Properties button to copy the
values from the table to the body)
8. Double click on the Modelling node name in the display list, select the
required rock property to use (eg density) from the list, click on the Create
Model File button and specify a model file name
The program will then build a model file and populate it with the bodies
belonging to the modelling node (only if they are also turned on for display).
Notes:
1. If you are using actual densities for the rocks, you should specify the
regional density value for the area. This value is then subtracted from the rock
density and you'll get a reasonable anomaly value.
2. You can also define multiple layers for the survey so that you can model
things like overburden
3. If you already have a 3D model set up with the interpretation features
defined, just add the modelling node to it as above and then move the
interpretation features so that they belong to the modelling node
24: Importing UBC/Zonge 2D IP inversion files
1. Start WinDisp and start a new layout (once you get WinDisp working)
2. Click on the Utility> Import UBC/Zonge IP inversion
3. Open up the dc inversion input file and the form should fill in all of
the remaining files (if not, then load any of the missing files)
4. Click on the Generate Grids and Layouts button and the files will be read and
grids and contour files and layouts created
5. Click on Done to dismiss the form and then click on the File menu item.
You will see that four layouts have been added to the MRU file list. The
layouts consist of a standard res/ip (and topo if it exists) pseudosection
display, a layout with observed res/ip along with the inverted res and IP, a
layout with observed and modelled res/ip and inverted res and IP, and a layout
showing observed and modelled along with error pseudosections.
6. You can modify the display scale and area limits using the Edit> Area
Limits, Scale and Projection menu item
7. You can change the title block using the Edit> Frame, Border and Colour
ranges menu item
8. You can change the data display using the Edit> Posting> Edit Posting
specification. Each panel in the display is listed on the posting form and
the display parameters can be accessed by selecting the required one and
clicking on the Define Data Variable button or by simply double-clicking on
the number for the one you want to modify
On the inversion import utility form, you can also specify a depth of
investigation inversion. This inversion is used to mask the inverted model using
the specified DOI factor.
Displaying UBC 3D IP inversion files
1. Start a new layout in WinDisp
2. Click on the 3DModels button to bring up the 3DModeller form.
3. click on the Mesh file selection button and open the required UBC mesh file.
4. Do the same for the Model file and then click on the Load button to the right
of the model file.
5. Once you have a model loaded, check out the data statistics on the Display
options tab to give you an idea of the distribution of the inverted parameter in
the model.
6. Click on the View Model tab and you will see a section display of the model.
You can scroll through the sections using the scroll bar at the right and you
can change the colouring of the section using the Red/Blue values at the bottom
of the form
7. You can change the section being displayed using the Section to View
drop-down list
8. You can save the current section grid as a Geosoft or ErMapper grid using the
Save Current button. The Save All button lets you save all of the section grids
(you'll be prompted with a list where you can select just the ones that are
required)
9. To view the model in 3D, set the Isosurface value to the value you want and
click on the Start 3D Viewer button.
10. Once the viewer is open, you can add more isosurfaces by changing the
Isosurface value on the form and then clicking on the Create New 3D Object on
the 3DModeller form
11. You can add a variety of 3d data to an existing 3d model in the viewer by
clicking on the 3D Files tab on the 3DModeller form and then clicking on the
required data type tab, specifying the data to display and then clicking on the
Create new 3D object menu item
12. Once you have a 3d model built, you can save it using the File> Save Model
menu item on the 3D Viewer
13. You can add more 3d objects to an existing 3d model by loading it into the
viewer, defining the new object in the 3D modeller form and then clicking on the
Create new 3D object menu item. Every time you add a new object, the current
model is automatically saved as current.bin in the current working directory, so
you always have the latest model you created
available in the event that the program dies for any reason
25: Creating UBC 2D IP reference and weighting matrices
It is possible to do both using WinDisp, but neither are entirely obvious or
easy. You can set up a reference model as follows:
1. load the mesh for the current inversion and click on the Create model from
mesh and specify the background level for the model and a file name for saving
it
2. Once the model is saved, click on the Load Model button to ensure that it has
been defined and loaded correctly and click on the View Model tab
3. Click on the Edit> Edit model menu item and define a body type that you want
to add to the reference model
4. scroll through the model display to get to the location you want to add the
body (the Display> Mesh and Display. Section lines help to show you where you
are in the model) and click on the displayed model image to add the body
5. Repeat this process until you have built a reference model that you want to
use and save it using the File> Save model menu item
6. Click on the Create> Weighting matrices menu item and the standard
weighting matrices for the current mesh are created
Once you've built the model and weighting matrices, you need to edit the
inversion input files to include them in the inversion process. The code I have
implemented was more of a test for doing constrained inversion using drillhole
sus values, so it's probably not much use for the general constrained case, but
it does at least create the standard files for you. Eg, the components for the
weighting matrices are written out separately along with corresponding mesh
files, so you can load them up and edit them to build a more realistic
weighting, but you then need to combine the edited components (in the order Ws,
Wx, Wy and Wz) into a single file in order to use it.
26: Setting up 2D IP inversions in WinDisp
1. Set up and display the IP data (resistivity and chargeability/phase)
2. Add any topo for the line if there is any
3. Click on the File> Options> Modify Defaults and select the IP inversion
method
4. Click on the Utilities > Create ... IP inversion and generate the
inversion files
5. Run the IP inversion (external to WinDisp for Loke) from the Utilities>
UBC/Zonge IP inversion interface
6. Once the inversion has finished, select the *_mod.csf file (created by
WinDisp in step 4) and display the results of the inversion as
observed/modelled psuedosections and inverted model
Notes:
1. For UBC and Zonge inversions, the Utilities> UBC/Zonge IP inversion
interface can be used to monitor and modify the inversion process
2. The Loke inversion process is a bit different as you have to run res2dinv
directly to perform the inversion and then use the Utilities> Import res2d IP
inversion process to convert the Loke output
3. If you are supplied with UBC inversion files run by someone else, you can
convert them for display using the Import UBC/Zonge IP inversion
4. If you have Zonge ipd/ipm files, you can import them directly using the
normal IP wizard display process
5. To add the topo to an IP display, set up the display as usual, click on
the Edit> Posting> Edit posting specifications. Then click on the first
blank line in the variable list and select Topo/Model Image from the
drop-down list and click on the Define Data Variable button to select and define
the topo file and format
There is some documentation on displaying and inverting IP data on the page
www.scicomap/WinDisp_help/windisp_ip_posting_menu.htm, though it is a little out
of date. Also there is a free utility (IPUtil) available on the downloads page
for doing some simple QC on IP instrument dump files which outputs the data to
standard Geosoft format.
Also, if you are going to run the inversions, you need to download the IP
Inversion Utilities from the WinDisp downloads page and copy them into a
directory which is in your path.
27: Depth of Investigation utility for IP inversions
To use the utility, start windisp and click on OK to start a new layout. Then
click on the menu item Edit> Import UBC IP inversion to bring up the Import
form. On the inversion Files tab select all the res and ip files used for the
base inversion by double-clickin on the file name text box or on the button at
the right. (I'll try to add an automatic file selection process that selects all
the file once you choose a res/voltage file, but that can wait a little while).
If there are no DOI inversion files you can then click on the Generate grids and
layouts button to set up the standard grid files and layouts for the inversion.
If you do have DOI files click on the second tab and select the relevant files
before clickong on the Generate button.
When you click on the Generate button, you'll be prompted to specify the name of
a data file to store the IP data. The process generates quite a few grid and
conour files, so it's probably best to create a new sub-directory
and store the IP data file in it. The process uses the file name you specify to
create a sub-directory below where the IP data file is to be created (with the
same name as the data file, but with _ubc appended).
The program then creates the IP data file and generates grids and contours for
the observed IP data and a csf file for displaying the observed pseudosections
and topo (if there is any). Once this has been created, the inversion and error
csf files are also created. The csf with err in it displays observed and
modelled pseudosections for res and ip as well as %difference and Z-score
pseudosections so you can see how good the fit is.
After generating the base layout, the program then reads the mesh, topo and
model files, masks the res and ip using the doi inversion, writes out an xyz
data file and generates the grids and contours required for the error and
inversion layouts. Once the process is complete, click on Done to get rid of the
import form and select the layout you want to display from the file list under
the File menu item. You may have to play around with the bottom depth for the
inverted models as my default bottom depth is fairly conservative.
To use the DOI with DCIP2D:
- perform a first inversion with some reference model (mref1).
- perform a second inversion with a different reference model (mref2).
mref2 should be different from mref1 by about a factor of 5.
Also, when you are doing the second inversion, the only parameter
in the interface that you should change is the "reference model".
- When the inversions are finished, make sure that in both cases they
have converged, and are equal to the reference model at depth.
- the DOI index is calculated using the following formula:
DOI = (m1 - m2) / (mref1 - mref2)
where m1 and m2 are the inversion results.
Therefore, on the surface where the model is controlled by the data,
DOI is close to 0. However, at depth where the inverted model approaches
the reference model, the DOI approaches 1.
28: Split facet items into separate bodies
Right click on the object in the display list and select the Split option in the popup menu. Specify the minimum number of faces and the name of the parent where they should be added and the bodies will be split into separate objects.
29: Displaying a 3D section grid in 3DModeller
1. Register the GIF image to produce a world or tab file so that WinDisp
knows how to convert between the "real" coordinates and pixel coords. You can do
this using the Utilities> Register a raster Image menu item in WinDisp. This
requires that you specify 3 point on the image along with the corresponding real
coordinates. I wasn't sure how to register your image as the coord along the top
of the image did not seem to match the name column in the csv file. Normally you
would specify the x axis limits of the image file using a station number (or
profile distance) defined in the baseline file.
2. Load up the baseline file as point data in the 3DModeller, start the
3DViewer and specify the mesh depth limits to encompass the depth of the seismic
section
3. Click on the 3D Files> Section grid tab on the 3DModeller form and
double-click on the first line in the section grid list
4, Select the registered GIF image on the Image files tab
5. Click on the Display Definitions tab and set the Raster Null drop-down to
None
6. Click on the Baseline Definitions tab, select the line2.csv file as the
Baseline, set the first data line to 2, read increment as 1, station as 1,
X=2, Y=3 and Z=4
7. Click on Done to go back to the Modeller form and then either close the
3DViewer and click on the Start 3DViewer button, or click on the Create New 3D
Object and then Done to create the new Section object. This will create a
seismic section in the 3DViewer which will be a pretty representation of the gif
image as it will be heavily pixellated, but it will at least confirm that the
definitions are ok.
8. Assuming that it is ok, close the 3DViewer and go back to the modeller form
and click on the Topography images tab and change the Maximum Cells value to
1024 (large enough to handle the full number of cells in the depth direction).
9. Click on the Sections grid tab and click right on the section grid line
that you have already defined and select the Copy menu item. The click left on
the first blank line, click right and select paste. Repeat this 4 time until you
have 5 section grids defined
10. Double click on the first section grid to edit the definitions, click on the
description and change it to line2000 part 1
11. Click on the Baseline definitions tab and change the End Grid value to 1992
(assuming the min value is 1880.7, the max is 2435.4, so 1/5 of the length is
111, so 1880 to 1992 will be 1/5'th of the total image). Click on the drop-down
list at the bottom of the form and repeat the process for the second grid
(Description: Line2000 part 2, min=1990, max=2101), and repeat for the rest of
the sections.
12. Once you've defined the sections, click on Done and then on the Start
3DViewer button and the 3d model will get built (which may be pretty slow as it
is duplicating a fair amount of work in loading and accessing the image file for
each section grid).
13. Once the model has been built, click on the Sections name in the display
list to select it, then click right and select Toggle smoothness from the popup
menu.
30: Add new data to an existing 3D model
It's pretty simple, but not entirely obvious. You just start up WinDisp as
normal, go to the 3DModeller and load the mesh file you used to build the
original model (though it doesn't need to be exactly the same one). Click on the
Start 3D Viewer button and then in the 3DViewer click on File> Read binary model
to load the existing model file. You can then go back to the 3DModeller form,
define whatever it is you want and the add it to the 3D model using the Create
new 3D object menu item on either the 3DModeller form or the 3DViewer form. Once
you're done, don't forget to save the new 3D binary model file.
The other way to do it is to build a 3D model of the new stuff you want to add
to the existing model, save it as a binary file, load up the old binary model
file and then click on the File> Append 3D model menu item. This will prompt you
for a vertical offset (which should be 0 if you have used the same mesh file)
and add the new model as a new one in the existing model. You can then move the
graphic object into the main part of the model and delete the remaining
extraneous objects.
31: Add a draped image in 3DModeller
2. Specify the base grid on which you wish to drape an image. If this is a dtm grid in the same coordinate space as the model then you do not need to change the image base, offset and image shift values. If the base grid is something like TMI or Bouguer, then you may need to specify values which will transform the actual grid value into a range that is comparable to that displayed in the 3D model
3, Select display style as Elevation and click on the Create New 3D Object menu item to ensure that the base grid is consistent with the current 3D model limits
4. Once you know that the base grid is displaying correctly, change the Display Style to Draped Image and select the draped image grid. This image can either be a normal value type grid or a raster style image (eg bmp or jpg).
5. Click on the Create New 3D Object menu item to display the draped image
Note that you may need to specify a different value for the Maximum Cells item at the top of the form. If the base grid size is nx,ny then the grid is sub-sampled until the actual number of cells satisfies sqrt(nx*ny)<= max cells. If the max cells is too large, then the number of triangles required to display the image can be so large that the image display is very slow. If the max cells is too small, then you can lose resolution in the image display.
Note too that it is often better to use WinDisp to display a sun-illuminated TMI image and then export the image as a BMP to then drape over the DTM. This give much better control over the displayed image as the 3DModeller only has limited control over how the draped image grid is displayed.
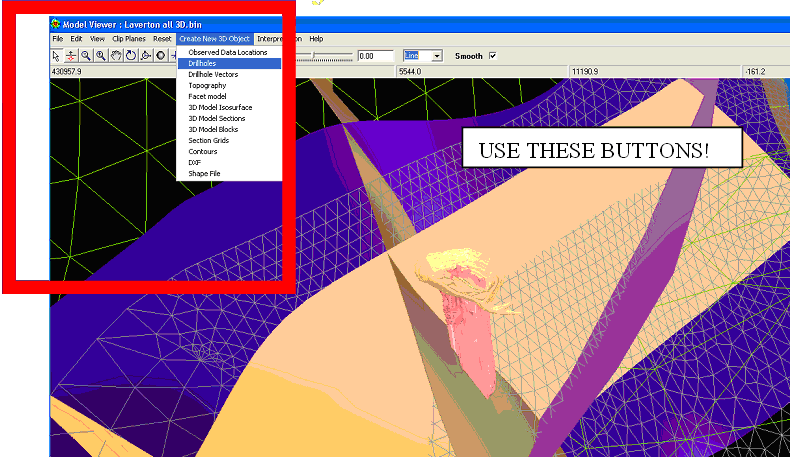
32: Adding a proposed drill hole trace into an exisiting 3D model
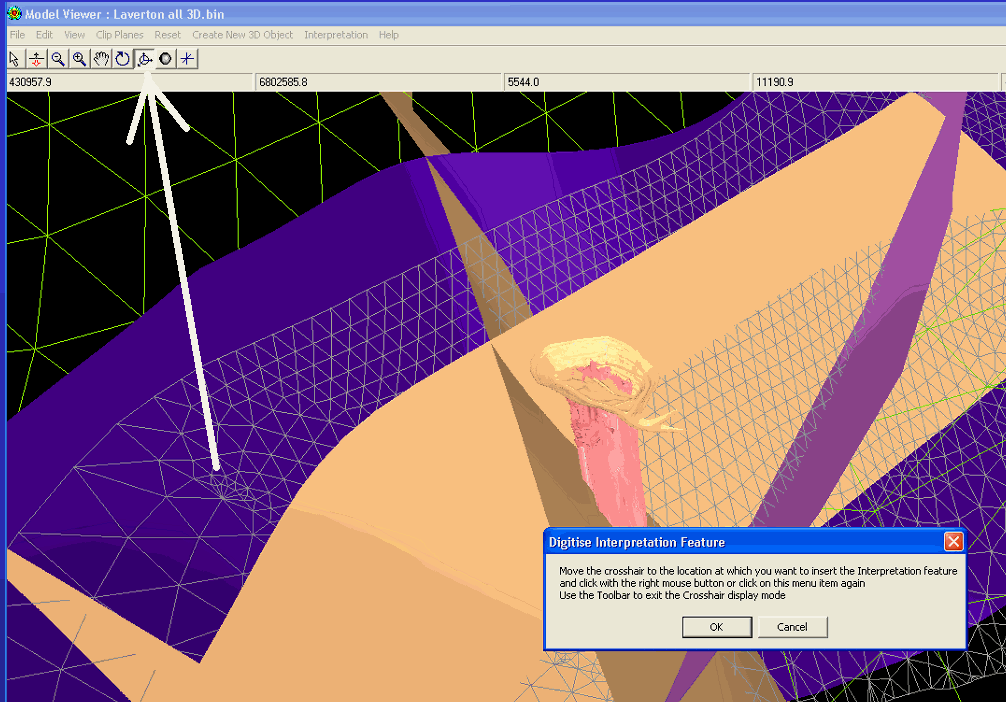
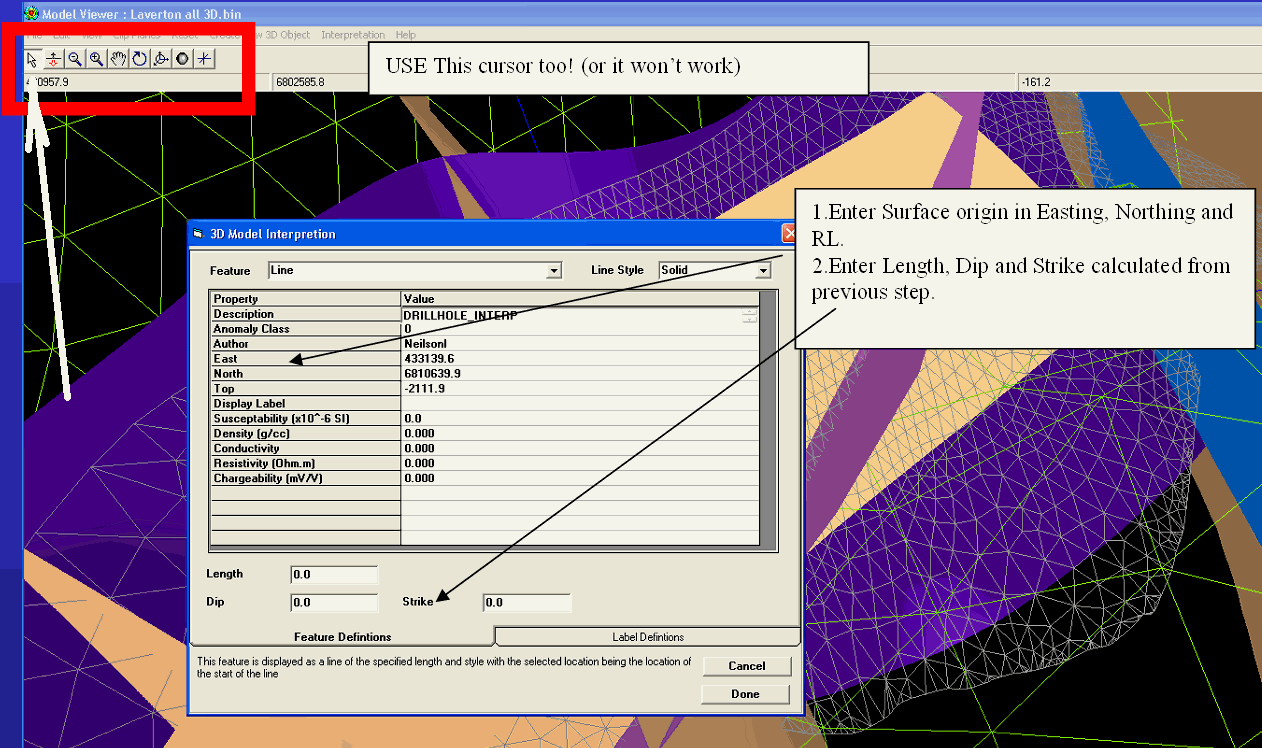
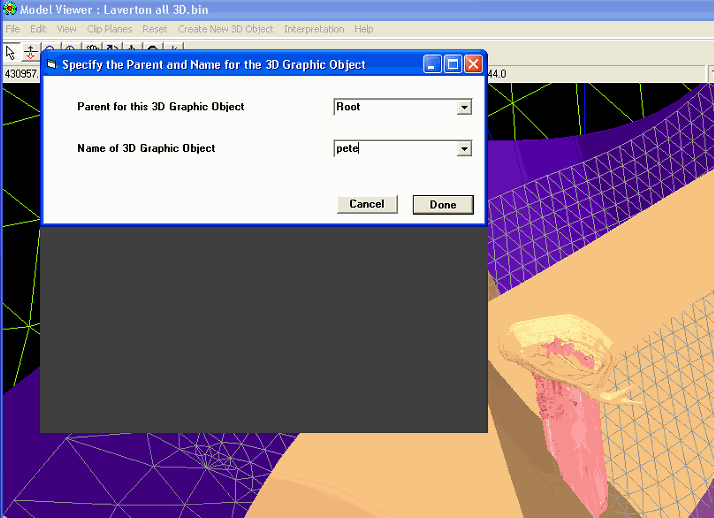
Adding a single drill hole
Go to the Create New 3D Object menu:
Click on the Determine Surface Coordinate button and use the right mouse to draw the drillhole:
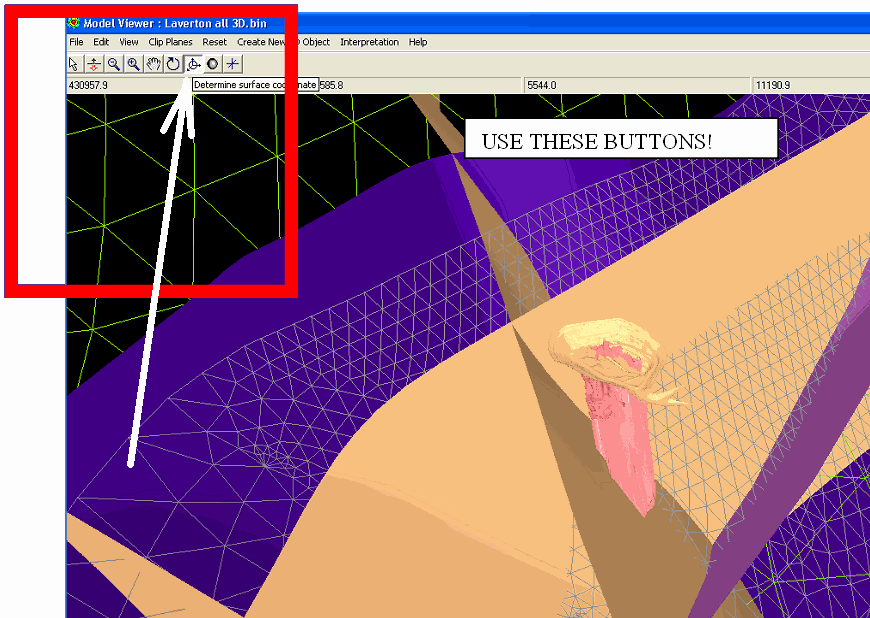
Make note of the following parameters:

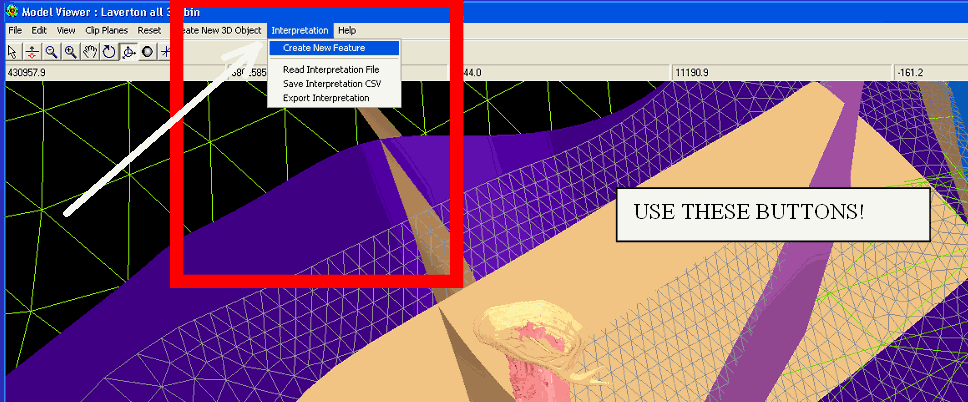
Now go to the interpretation menu:
Prepared by:
Yvonne Wallace yvonne_wallace@placerdome.com
Laverton, Western Australia 08 9088 2218
Ian Neilson : Jigsaw Geoscience ineilson@jigsawgeoscience.com.au
Edited: P. Kowalczyk 2005.10.14
33: Batch format conversion or coordinate transformations of facet files
To convert a batch of files Start WinDisp as usual, close the opening form, click on the Utilities>Batch Converter menu item to bring up the converter form.
Next click on the Select Files to Convert and this brings up the Facet File list form. Click on the Add Files button, navigate to the source
directory, specify the file type to add and click on Open. Repeat this process for as many different file types that you want. Note that you can use the standard windows multiple select process to select the required files in one hit.
Once you have your list of files, click on the first file in the list and ensure that the file format is ok. The file format is based on the file extension, so if it's not one of the standard 00t or bt2 or ts files, you may need to specify the format. Also if the files for any faceted body are coord/facet file pairs you need to select the coord file from the Add Files button and then add the facet file in the format definition.
Once the files have been selected and the formats checked, click on Done to return to the Batch Converter form.
Next click on the First Stage Transform button and define or load the
transform to be applied. This is not required if you just want to do a
format conversion, in which case you should turn off all the check marks in case you have previously defined one or more of the transforms.
If you need to change the projection and/or datum shift of the coordinate system, then it is necessary to specify some or all of the Source projection datum shift and target projections (depending on the source and target coord types).
There is also an option to apply a Final Stage transform (same format as the first stage transform), just in case there are situations where it is required.
Once the transforms have been defined, click on the test buttons to check that the specified transforms are actually doing the right thing. Once this has been verified, click on the Specify Output tab, select the required output location and (optional) new directory name where the files are to be created, select the desired output format and click on the Perform the Conversion button. Note that the program won't let you output a file into any of the source data directories, but other than that the program will overwrite any existing files in the target directory. This saves having to clean up any previous conversion attempts.
Once the facet files have been converted, click on Done to return to WinDisp.
The Facet model display part of the 3DModeller code allows multiple facet files to be loaded and displayed. The process uses the same Facet List form as the Batch Converter. The 3DModeller form displays the current list of selected files. Click on the Modify Facet File List
button to bring up the Facet List form and add or remove files using this form. Also use this form to modify the facet file format. Click on Done or Cancel once you've finished with the file list.
After a list of files has been selected, the files can be assigned unique colours by clicking right on the Facet File grid and selecting the desired option from the Assign File Colours menu options. If you click on a single file in the list you can also delete it using the Delete File menu option. Once all the facet files have been selected and the colours assigned, they will all be loaded when you start the 3DModeller.
34: Displaying multiple datasets in 3DModeller
When you have mixed data for one area (eg dtm, mag and drillholes), you just
set up each type of data in the one session and display the model. For example
you may have a mag image draped over the dtm in the Topography grid tab on the
3D Files tab and define the drillholes on the Drillholes tab.
If you have multiple sets of the same type of data (eg gravity image as well as
mag image to drape over the dtm), then you simply build the model using the
first set of data, then (keeping the 3DViewer open), you go back to the
3DModeller form, change the data you want to display and then click on the
Create New 3D Object menu item on the 3DModeller form and give the item a new
name and it will be added to the current 3D model.
So adding several kinds of data is a progressive process of defining the
initial model to display and then adding new objects to build the complete model
(Note that it's a good idea to save the model layout definitions using the File>
Save Model layout menu item on the 3DModeller form for each item that you are
defining so that it's easy to load the definitions later on if you want to
rebuild the model).
Alternatively, you can build a separate 3d model containing each separate 3D
object and save it as a separate binary model. The use the File> Read binary
model menu item on the 3DViewer form to read the initial model and then use the
File> Append 3D binary model menu item to add each of the separate model files
you created. If you use this approach, the appended models are added a new node
in the model tree so you'll want to move the nodes in the sub-tree to the main
tree and delete the unwanted nodes. You can move nodes by selecting them in the
tree list and dragging them to the place you want them or you can select the
node to move by clicking on it and then clicking on the Move button. Similarly
you can delete a node by selecting it and then right-clicking on it and
selecting Delete this node from the pop-up menu.
35: Displaying datamine models
Datamine loading isn't all that obvious on the facet definition form. For datamine facet models, they model the file into two files. One for the corner coords and one for the triangles. These files have standard data columns for the coords (XP, YP, ZP) and for the triangles (PID1, PID2, PID3). The data columns are usually in standard column order, but there is no guarantee of this, so I've defaulted the XP, YP and ZP columns to be 1, 2, 3 and the PID1, PID2,and PID3 to be 2,3,4 respectively. Also I've modified the code to add a Datamine point binary file (*pt.dm) so that if a coord file is selected with a name of this form, I also check if there is a corresponding *tr.dm or *tri.dm file and use it as the facet definition file if it exists.
I've also modified the View File code for Datamine files, so that you can view the actual data names and values in the file to make sure that the files do contain the correct data.
Note too that when you select the facet coord files, you can do a multi selection (using the usual shift or ctrl keys) to select all of the files that you want to display.
36: Digitising 3D surfaces from drillhole data
2. Start up a section viewer as usual
3. Click on Digitise> Start Points on the section display form
4. Specify a name for digitising
5. Click on File> Read drillhole digitising file on the section form menu and select the previously created drillhole.3dd file
6. Turn on the Snap option, the snap to interval using field and select StratValue
7. Select the required value from the field value drop-down
8. Click on Generate intercepts and then Display as Facets
9. You can then click right in the section window (or Shift-right in 3DViewer) to select bad points and delete them
37: Displaying the CDI sections in 3D
1. Once you have generated all of the CDI grids, start up the 3DModeller, click on the 3D Files tab and then the 3D Sections tab.
2. Open a Windows Explorer window and navigate to the folder containing the gdb file. There should be one folder for each line. Click on the folder for each line and there should be an xyz file and the grid files you requested on the CDI grid export form
3. For each grid file there should also be a file with the extension sct. Click on the required type (res, logres or con) and drag it onto the Section Grid list on the 3DModeller form
4. Repeat this for each line required until you have a complete list
5. Once you have selected all of the required grids, click on the Start 3DViewer button and select a world plot scale when prompted.
6. The sections will then be displayed in 3d
7. Note that each grid has its own colour scheme. If you want to have a uniform scheme. Close the 3D Viewer and click on the Build Histogram From Section Grids button and save the histogram using some appropriate name
8. Double click on the first line in the section grid list (taking care not to toggle the Display column from Yes to No)
9. Click on the Display Definitions tab and click on the Select Histogram button at the right of the Histogram File textbox
10. Select the histogram file that you created at step 7
11. Click right on the Histogram File label at the left of the text box and select Copy All from the pop-up menu
12. Click on Done and start the 3D Viewer again and all sections will be displayed using the same colour range
38: Loading a Loke Resinv3D inversion files into the 3DModeller
To use the program to view res3dinv files proceed as follows:
1. Start WinDisp, click on OK to start a new layout and click on the
3DModels menu item
2. Click on the select mesh file button (next to the Mesh file text box) and
navigate to the directory containing the inv file output by res3dinv
3. Click on the Load File button and WinDisp will then scan and decode the file
and save each iterate (and sensitivity matrix) to a UBC style file
4. Click on the Load Model File button, navigate to the required directory and
select the required file
5. Click on the Load File button to load the model file
6. Click on the View model tab and select the section to display and the blue
and red values to give the colour display you require
7. Click on the Start 3DViewer button to see the isosurface draped below the
topo (if there is any)
39: Add the mag draped over the topo in an existing 3D model
2. Click on the File> Append Binary model menu item and select the current bin file
3. Click on OK to select the specified offset for appending the model
4. Click on the + sign next to the new node created when the model is imported
5. Click on the TMI node to select it and then click on the Move button and select Root as the new parent node
6. Repeat step 5 for the TMI sun illuminated node
7. Click on the new added model file node created in step 2 to select it and click on the Delete button
8. Click on the File> Save binary model and give the model a new name
40: BIFbuilder Utility notes
To try out the interface proceed as follows:
1. Display a grid file (note has to be a single grid)
2. click on the button on the toolbar with no icon on it to start BIF digitising mode
3. digitize a sequence of points along the bif and press esc when you're done
4. fill in the mag field and basic body parameters on the BIF parameters form
5. the BIF body data structure are filled in and the grid files are calculated (if required) and displayed
6. the BIF builder form is displayed showing the TMI, VG and total gradient grids
7. The profiles below the images show the grid profiles along the line of the down-dip direction for the first node in the list
8. the leftmost grid shows the x,y and z coords of each node along the top centre of the bif
9. clicking on a node in the list selects that node and allows the x,y and z values to be varied
10. the scroll bar to the right of the easting moves the node in the along dip direction
11. the scroll bar to the right of the northing moves the node in the strike direction
12. the scroll bar next to the z moves the node up and down
13. when a node is selected, the rightmost grid displays the down-dip points defining the lamina for the bif
14. clicking on a layer in the grid selects that layer and allows the data for the layer to be varied
15. the depth value specifies the vertical depth extent of the selected lamina at the current node (note is independent for each node, but I'll add an option to allow them to be tied together)
16. the width value is the width of the bif at the top of the current layer
17. the dip value specifies the dip of the current layer
18. the azimuth specifies the direction of the dip at the top of the current layer (changing the azimuth is fed down the line and "swings the tail"
19. the large graph next to the layer list shows a section view relative to the current node (note this is not corrected for changes in azimuth down the line)
20. the narrow graph to the right of the section graph shows the plan view of the current down-dip trace together with any immediate sections of the baseline
21. the small graph at the bottom shows the top of the bif as a function of profile distance
22. moving the mouse over the graphs moves a marker on the main images to show where the mouse is relative to the bigger picture
23. the grid profiles have green vertical bars showing the width of the dyke at the top of the body
24. the body drop-down list and the add and delete points/body buttons don't work yet (and the current code behind them will probably kill the program)
25. the File > Save and File > Read options have been implemented, but doing a File > Append is probably not a good idea just yet
41: Derivative Ensemble Grid Transform
This version has a new grid operation which I have called Derivative ensemble and one of the options for this transform is to output the SOM file. I've done it this way so that people can use the option to generate a standard set of grids without also creating the SOM file as this can be quite large.
I generate all of the grids required for SOM and also calculate the total gradient (or analytic signal), ASVI and 2 other grids grad(=dx+dy+dz) and del=(dxdx+dydy+dzdz). I'm not sure if the latter 2 grids are useful for anything, but I was interested in seeing what they looked like. For a potential field in free space, the del grid should be identically 0, and to a pretty good approximation that is the case, so maybe places where it isn't zero it indicates that there is something odd about the data.
Also, when applying the SOM option, a second grid is assumed to be a target grid and is written out into the SOM output file. The program does a reinterpolation and merge of the second grid to the first when you click ojn the Transform Grid button, but the actual output is only based on the original grid.
SEGY Shot point coordinate export
The attached dll reads the coords (and elevation) data from the trace headers and exports the xyz data. The elevation I export is the Surface Elevation field and the coords are the Source X and Y values